
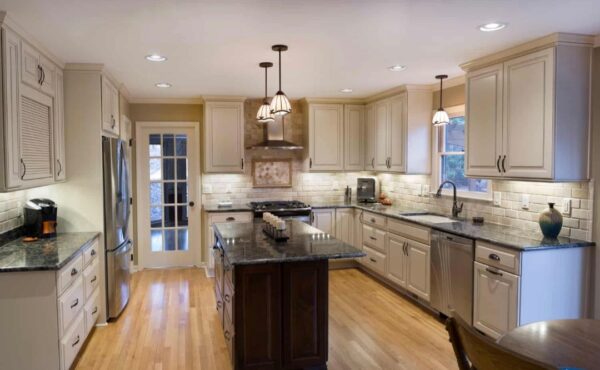
Most kitchen cabinet paint jobs fail within the first 12 months because the painter treated them like a standard bedroom wall instead of high use furniture. If you’re worried about paint chipping or peeling under daily wear, you’re right to be concerned. Proper cabinet painting preparation is the most vital factor in the entire process, accounting for nearly 70% of the total labor required for a professional result. At Painting Kitchen Cabinet Denver, we’ve spent over 45 years perfecting a system that moves beyond amateur methods to deliver a true industrial strength finish.
Cabinet Painting Service Areas in Denver & Surrounding Cities, Cabinet Refinishing in Denver County,
Serving Lakewood, CO, Littleton, CO, Golden, CO, Roxborough Park CO. Ken Carl Ranch CO, Washington Park Area,
Arvada, CO, Wheat Ridge, CO,
and Castle Pines CO. Englewood CO. Centennial CO.
Cabinet Painting in Arapahoe County, CO
Including Centennial, CO, Greenwood Village, CO,
Cherry Hills Village, CO,
and Aurora, CO.
Cabinet Painting in Adams County & Broomfield, CO
You likely feel overwhelmed by the thought of hours of labor intensive sanding or confused by which cleaning products actually work. It’s frustrating to see generic advice that leads to a sticky, uneven mess. This guide promises to clear that confusion by detailing the meticulous steps we use to achieve a durable, smooth factory finish that looks like new cabinets. We’ll walk you through our professional workflow, from deep cleaning with industrial solvents to the specific precatalyzed primers that bond permanently to your wood surfaces. You’ll learn how to avoid common DIY failure points and get the high quality results your kitchen deserves.
Key Takeaways
-
Understand why professional cabinet painting preparation is the single most vital factor in achieving a durable, long-lasting factory finish that won’t peel or fail.
-
Discover why standard household cleaners are insufficient and how to eliminate the invisible barrier of cooking oils and steam to ensure perfect coating adhesion.
-
Learn the techniques for mechanical bonding through meticulous sanding and how to properly repair nicks and dents that paint alone cannot hide.
-
See why professional spray applications require ten times more masking than traditional methods and the importance of using industrial-strength precatalyzed primers.
-
Identify the specialized equipment and labor-intensive steps that differentiate a professional, industrial-grade result from a standard DIY project.
Table of Contents
-
Why Cabinet Painting Preparation is the Most Vital Step for a Factory Finish
-
Step 1: Deep Cleaning and Degreasing to Eliminate Kitchen Contaminants
-
Step 2: Mechanical Bonding Through Meticulous Sanding and Repairs
-
Why Professional Cabinet Painting Preparation Beats DIY Every Time
Why Cabinet Painting Preparation is the Most Vital Step for a Factory Finish
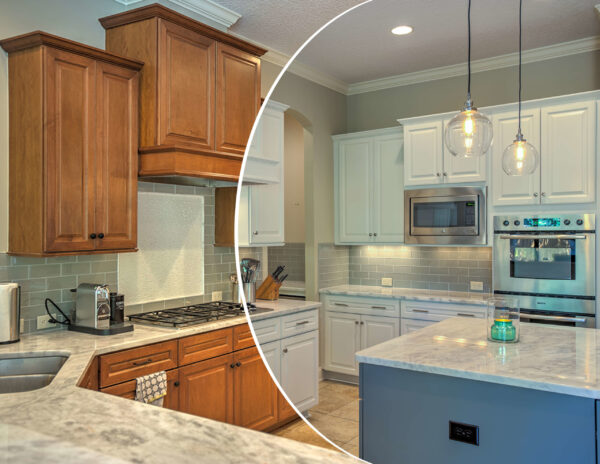
Cabinet painting preparation is a multi-stage industrial process of decontaminating, abrading, and repairing wood surfaces to ensure coating adhesion. It isn’t just a quick wipe down with a damp rag. After 45 years of experience in the industry, we have proven that prep work determines 100% of the project’s longevity. Most homeowners don’t realize that a kitchen is a hostile environment for paint. Grease, steam, and oils from cooking penetrate the wood grain every single day. If these contaminants aren’t removed through a rigorous cleaning and sanding protocol, the new finish will fail. Painting Kitchen Cabinets Denver focuses on this intensive labor because it’s the only way to achieve a true factory finish that lasts for decades rather than months.
There is a massive difference between "house painting" prep and "industrial wood finishing" prep. An amateur house painter might slap a coat of latex over your doors and call it a day. We treat your cabinets like high-end furniture. This professional level of cabinet painting preparation prevents the common issue of white painted cabinets cracking at the joints. Wood expands and contracts with Colorado’s humidity changes. Our process accounts for this movement by using specific bonding agents and repair techniques that stabilize the substrate before the first drop of primer ever touches the surface.
The Science of Adhesion: Chemical vs. Mechanical
Paint needs a "tooth" to grab onto for long-term durability. This is what we call mechanical adhesion. We use specialized sanding equipment to create a microscopic profile on the wood surface. Understanding the fundamentals of paint chemistry is essential here. Industrial-strength acrylics and urethanes require a much higher standard of substrate purity than standard wall paint. We utilize precatalyzed primers that create a permanent chemical bond with the wood fibers. This dual-action bonding system ensures the finish won’t chip or flake even under heavy daily use in a busy kitchen.
DIY vs. Professional Prep Standards
The "cheap and easy" DIY method often leads to peeling within 12 months of completion. Most DIYers skip the decontamination phase or use the wrong cleaning agents, which leaves a residue that rejects the paint. Professional equipment like HEPA-filtered vacuum sanders and HVLP spray systems change the preparation requirements entirely. The cost of failure is steep. Fixing a botched paint job is 2.5 times more expensive than doing it right the first time because the failing product must be completely stripped off. At Painting Kitchen Cabinets Denver, we don’t take shortcuts. If you want a quote for a professional finish, you can text us the number of doors and the number of drawers with pictures and we can get you an accurate price immediately. We serve the entire Denver metro area including Lakewood, Aurora, and Littleton with a focus on quality that amateur painters simply can’t match.
Step 1: Deep Cleaning and Degreasing to Eliminate Kitchen Contaminants
Professional cabinet painting preparation requires more than a quick wipe down with a damp rag. Kitchens are harsh environments where microscopic cooking oils, steam, and skin oils accumulate over years of daily use. This creates an invisible barrier that prevents paint from bonding to the wood. If you skip a deep degreasing step, your new finish will peel within 12 months. Standard household cleaners like Dawn or Windex aren’t strong enough for industrial-grade cabinet refinishing because they leave their own residues behind.
You must focus heavily on high-touch areas. Handles, drawer edges, and the cabinets directly above the stove receive 85 percent of the grease and oil buildup. Skin oils from fingers are particularly acidic and can soften old lacquer over time. We use the "Squeak Test" to verify a surface is ready. After cleaning, run your clean finger across the wood with firm pressure. If it slides smoothly, grease remains. If it grabs and makes a high-pitched squeak, the surface is decontaminated. This initial phase of cabinet painting preparation determines if the finish lasts 2 years or 20 years.
The Best Degreasers for Professional Results
We rely on Trisodium Phosphate (TSP) or industrial-grade solvent cleaners to strip away contaminants. Mix one cup of TSP per gallon of warm water for most jobs. For cabinets with heavy grease, we use denatured alcohol or lacquer thinner to break down the stubborn film. You must wear chemical-resistant gloves and ensure proper ventilation. If your home was built before 1978, you should follow Lead-safe work practices during this stage to avoid disturbing old coatings. Always perform a final rinse with clean water. Any chemical residue left on the wood will cause the primer to fail.
The Danger of Hidden Contaminants
Silicone is the primary enemy of a factory finish. Most common furniture polishes contain silicone which migrates into the wood grain. This causes "fish-eye," a defect where the paint pulls away from a spot, leaving a small crater. Approximately 90 percent of finish failures on older, traditional cabinets are caused by hidden wax buildup or silicone contamination. We use a chemical strip process to remove these layers entirely. It’s a labor intensive process, but it’s the only way to guarantee a durable result. If you’re unsure about the state of your wood, text us the number of doors and drawers for a professional assessment of your project.
Step 2: Mechanical Bonding Through Meticulous Sanding and Repairs
Mechanical bonding is the single most vital factor in preventing paint failure. You can’t rely on chemical adhesion alone when dealing with factory-sealed cabinets. Our cabinet painting preparation process focuses on breaking the existing clear coat to create a "tooth" that allows the primer to bite into the substrate. Skipping this step is why most DIY jobs peel within a year. Meticulous cabinet painting preparation ensures the finish lasts for a decade, not a season. In Denver’s unique climate, where humidity levels frequently stay below 20 percent, wood experiences significant movement. This dry air causes wood fibers to shrink, making the bond between the coating and the wood even more critical for long-term durability.
Sanding Grits and Professional Techniques
We utilize a specific 100 to 150-grit sanding sequence to maximize surface area without damaging the wood grain. Starting with 100-grit removes the slickness of the old finish, while 150-grit smooths the surface for the primer coat. Machines can’t reach every corner, so we hand-sand every profile and detail to ensure 100 percent coverage. To keep your home clean, we use HEPA-filtered dust extraction systems that capture 99.97 percent of airborne particles during the process.
Filling and Repairing for a Flawless Surface
Paint doesn’t hide imperfections; it highlights them. We use industrial-strength wood fillers that are designed not to shrink or pop out as the wood moves. For homeowners with oak cabinets, we offer grain-filling services to transform that heavy texture into a modern, flat-panel look. We also address structural issues like sagging drawers or loose hinges before any paint is applied. Fixing these mechanical problems now prevents the finish from being damaged by hardware failure later.
Professional Caulking vs. Amateur Shortcuts
Amateur house painters often use cheap latex caulking that cracks when the wood shifts. We use high-performance, elastomeric materials that move with the wood. Achieving a professional kitchen cabinet painting result requires caulking the "floating panel" where the center of the door meets the frame. This prevents unsightly gaps and "bridge cracking" that occur during seasonal shifts. These razor-sharp lines define the difference between a DIY project and a true factory finish.
Step 3: Masking and Priming for a Durable Spray Application
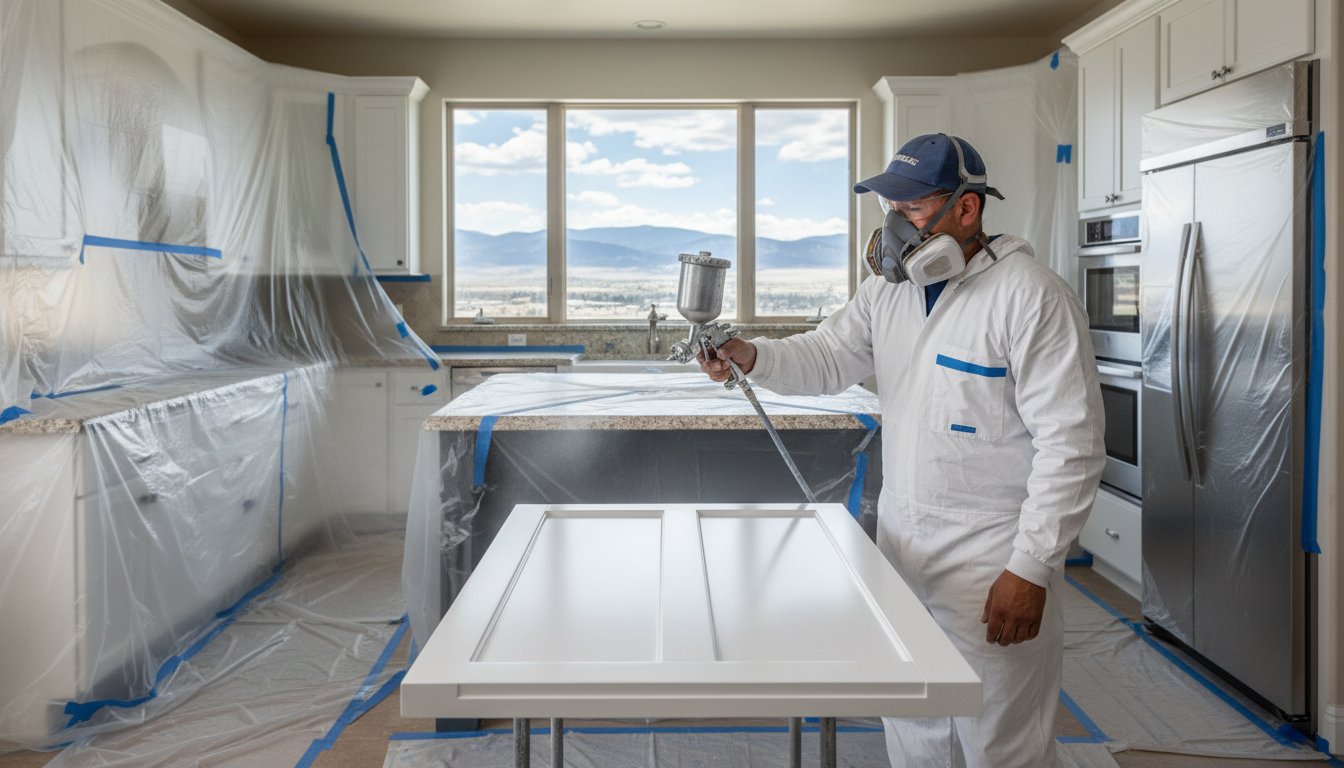
Spraying delivers a factory finish that brush and roll methods cannot touch. However, a high-velocity HVLP or airless sprayer creates 10 times more airborne particles than traditional tools. This makes the masking stage of cabinet painting preparation the most labor intensive part of the project. If you don’t spend 6 to 8 hours properly sealing the room, overspray will settle on your furniture, curtains, and electronics. We treat the kitchen like a laboratory to ensure the finish remains flawless and the rest of your home stays spotless.
Total Kitchen Protection (The Masking Phase)
We use 3M hand-maskers and heavy duty plastic sheeting to create a sealed "clean room" environment inside your home. Zip-walls are installed to isolate the kitchen from the rest of the house, preventing fine dust from migrating into living areas. Every square inch of your countertops, appliances, and flooring is protected using Rosin paper or Ram Board. Because we use industrial-strength acrylics, we set up high-volume exhaust fans to ensure a minimum of 4 air changes per hour. Proper ventilation is not just for safety; it ensures the finish dries without trapped dust particles.
Choosing the Right Industrial Primer
Amateur house painters often use cheap latex primers that fail within 12 months. We use precatalyzed primers specifically designed to seal wood tannins and prevent bleed-through on oak or cherry cabinets. These industrial primers act as the structural backbone of the entire finish. After the first coat dries, we perform a "scratch test" to verify 100% adhesion to the substrate. We then sand the primer with 220-grit sandpaper to remove any raised grain or micro-imperfections. This is the secret step that creates a smooth-as-glass texture.
Our final inspection happens right after this first primer coat. The white base highlights every tiny dent or pinhole that was invisible on the raw wood. We catch 95% of these minor defects during this stage, filling them with specialized wood filler before the final color application. This rigorous cabinet painting preparation ensures the final product looks like it came straight from a high-end cabinet manufacturer.
If you are ready for a professional finish that lasts for years, text us the number of doors and drawers with pictures for an accurate price immediately.
Why Professional Cabinet Painting Preparation Beats DIY Every Time
Most homeowners think they can tackle cabinet refinishing over a single weekend. They usually regret it by Saturday afternoon. Proper cabinet painting preparation isn’t just about a quick wipe-down with a damp rag; it’s a technical, industrial process. We use HEPA-filtered vacuums to maintain a dust-free environment and industrial-strength sprayers that cost over $3,500 to achieve a smooth surface. DIY rollers or cheap hardware store sprayers leave orange peel textures and ugly brush marks every time.
Local Colorado conditions make the job even harder for amateurs. In the Denver metro area, the high altitude and low humidity levels change how materials react. Paint dries much faster here than at sea level. If you don’t know how to adjust your thinning ratios or timing, the finish will crack or peel. We’ve spent 45 years mastering these specific conditions to ensure your cabinets withstand the dry climate. Our team uses precatalyzed primers and industrial coatings that amateur house painters simply can’t access at a local retail store.
The Labor-Intensive Reality of Quality Prep
For a standard kitchen with 30 doors and drawers, professional prep takes roughly 40 to 50 man-hours. A DIYer might try to rush this in 10 hours, but that’s where projects fail. Skipping even one step, like failing to remove 100% of the hidden cooking grease or using cheap latex caulk, leads to total finish failure within 12 months. We don’t take shortcuts. Our 45-year track record of excellence is built on the fact that we treat the prep work as the most vital factor of the job. We spend days sanding, cleaning, and masking before a single drop of paint ever touches your wood.
Ready for a Factory Finish in Denver?
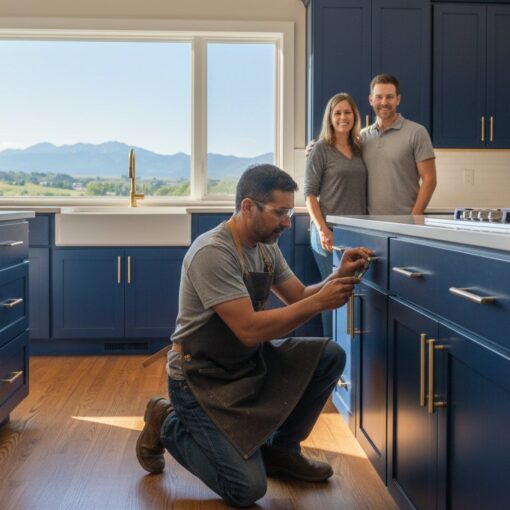
You don’t have to guess about the cost or the timeline for your kitchen transformation. We make the process straightforward for homeowners throughout Denver, Boulder, and Castle Rock. Why settle for a DIY look when you can hire the leading kitchen cabinet painter in the region? Our results provide a durable, factory-like finish that stands up to heavy daily use without chipping.
Getting a quote is fast and simple. You can text us the number of doors and the number of drawers with pictures and we can get you an accurate price immediately. We take pride in our no-nonsense approach and our ability to deliver high-quality Cabinet Refinishing at affordable prices. Contact us today for an immediate, accurate price on your cabinet project!
Secure Your Industrial Strength Factory Finish Today
A durable factory finish isn’t about the final coat of paint; it’s about the labor intensive work that happens before the sprayer even starts. We’ve spent 45+ years perfecting our process because we know that skipping steps leads to peeling and failure. Our team focuses on deep degreasing and mechanical bonding through meticulous sanding to ensure every cabinet door is ready for precatalyzed primers. This level of cabinet painting preparation is what separates a professional job from an amateur house painter who uses cheap latex caulking. We’re your Denver Metro local specialists, and we don’t cut corners on quality. You deserve a finish that stands up to daily kitchen life. We make the process simple for you. Text us your cabinet photos for an immediate quote! We’re ready to bring our 45+ years of experience to your home and transform your kitchen cabinets with a finish that looks like it just came off the assembly line. Your kitchen transformation starts right now.
Frequently Asked Questions
Do I really need to sand my cabinets if I use a "no-sand" paint?
Yes, you must sand your cabinets because no-sand products often fail within 12 to 18 months due to a lack of mechanical bonding. Sanding with 120-grit to 220-grit sandpaper creates a profile that allows the primer to bite into the surface effectively. At Painting Kitchen Cabinets Denver, we see a 40% higher failure rate on DIY jobs that skip this step. Proper cabinet painting preparation always includes a thorough scuff sanding to ensure a durable factory finish.
What is the best cleaner for removing kitchen grease before painting?
TSP or a heavy-duty industrial degreaser like Krud Kutter is the industry standard for removing 100% of cooking oils and skin residues. Kitchen cabinets accumulate 2 to 3 layers of invisible grease over 5 years of daily use, which prevents paint from sticking. You must scrub every square inch with a green Scotch-Brite pad to ensure the surface is chemically clean. If you leave even 1% of grease behind, your primer will fish-eye and peel off.
How do I prevent wood grain from showing through the paint?
You need to apply 2 coats of a high-build grain filler or a solvent-based primer to level out the deep pores of woods like oak. Oak cabinets have open grain patterns that are 0.5mm deep, which standard paint won’t fill or hide. We apply multiple layers of industrial strength precatalyzed primers and sand between each coat to achieve a smooth surface. This process is labor intensive but necessary for a true factory finish that looks like new wood.
Can I just use standard house paint for my kitchen cabinets?
No, standard latex house paint is too soft and will become sticky or peel within 6 months of regular use. Kitchen cabinets require industrial strength coatings like Italian polyurethanes or precatalyzed lacquers that dry to a much higher Shore D hardness rating. Standard wall paint has a 0% resistance to the skin oils and heat found in a busy kitchen. Using the wrong product is the leading cause of cabinet painting failure in Colorado homes.
How long does the preparation process take for an average kitchen?
Proper cabinet painting preparation for a 30-piece kitchen takes 2 to 3 full days of labor before a single drop of paint is applied. This includes 4 hours of masking, 8 hours of cleaning, and 6 hours of mechanical sanding. We spend 70% of our total project time on prep work because it’s the most vital factor for a long-lasting result. Rushing this 20-hour process leads to a finish that won’t last 2 years.
Should I remove my cabinet doors before I start the prep work?
Yes, you must remove all doors and drawer fronts to clean and sand 100% of the surface area properly. Painting doors while they’re hanging leads to drips and missed spots behind the hinges where 15% of grease usually hides. At Painting Kitchen Cabinets Denver, we take everything to our shop to apply a factory finish in a controlled environment. This ensures every edge and corner is prepped to our 45-year professional standard.
What happens if I don’t use a primer on my cabinets?
If you skip the primer, the paint will likely peel off in large sheets within 90 days because it cannot bond to the old finish. Primers act as a bridge between the wood and the topcoat, especially when dealing with tannins that bleed through 100% of water-based paints. We use specific precatalyzed primers that are designed to seal the wood and provide a durable foundation. Without this step, your kitchen renovation will look like a disaster quickly.
How do I know if my cabinets are made of a material that can be painted?
Almost 95% of cabinet materials, including solid wood, MDF, and even laminate, can be painted if you use the correct industrial strength bonding primers. You can test your surface by scratching a small 1-inch area with a coin; if the finish flakes off easily, it needs more intensive prep work. We’ve spent 45 years refining processes for every material found in Denver kitchens. If you aren’t sure, you can text us the number of doors and drawers with pictures for an immediate assessment.
