
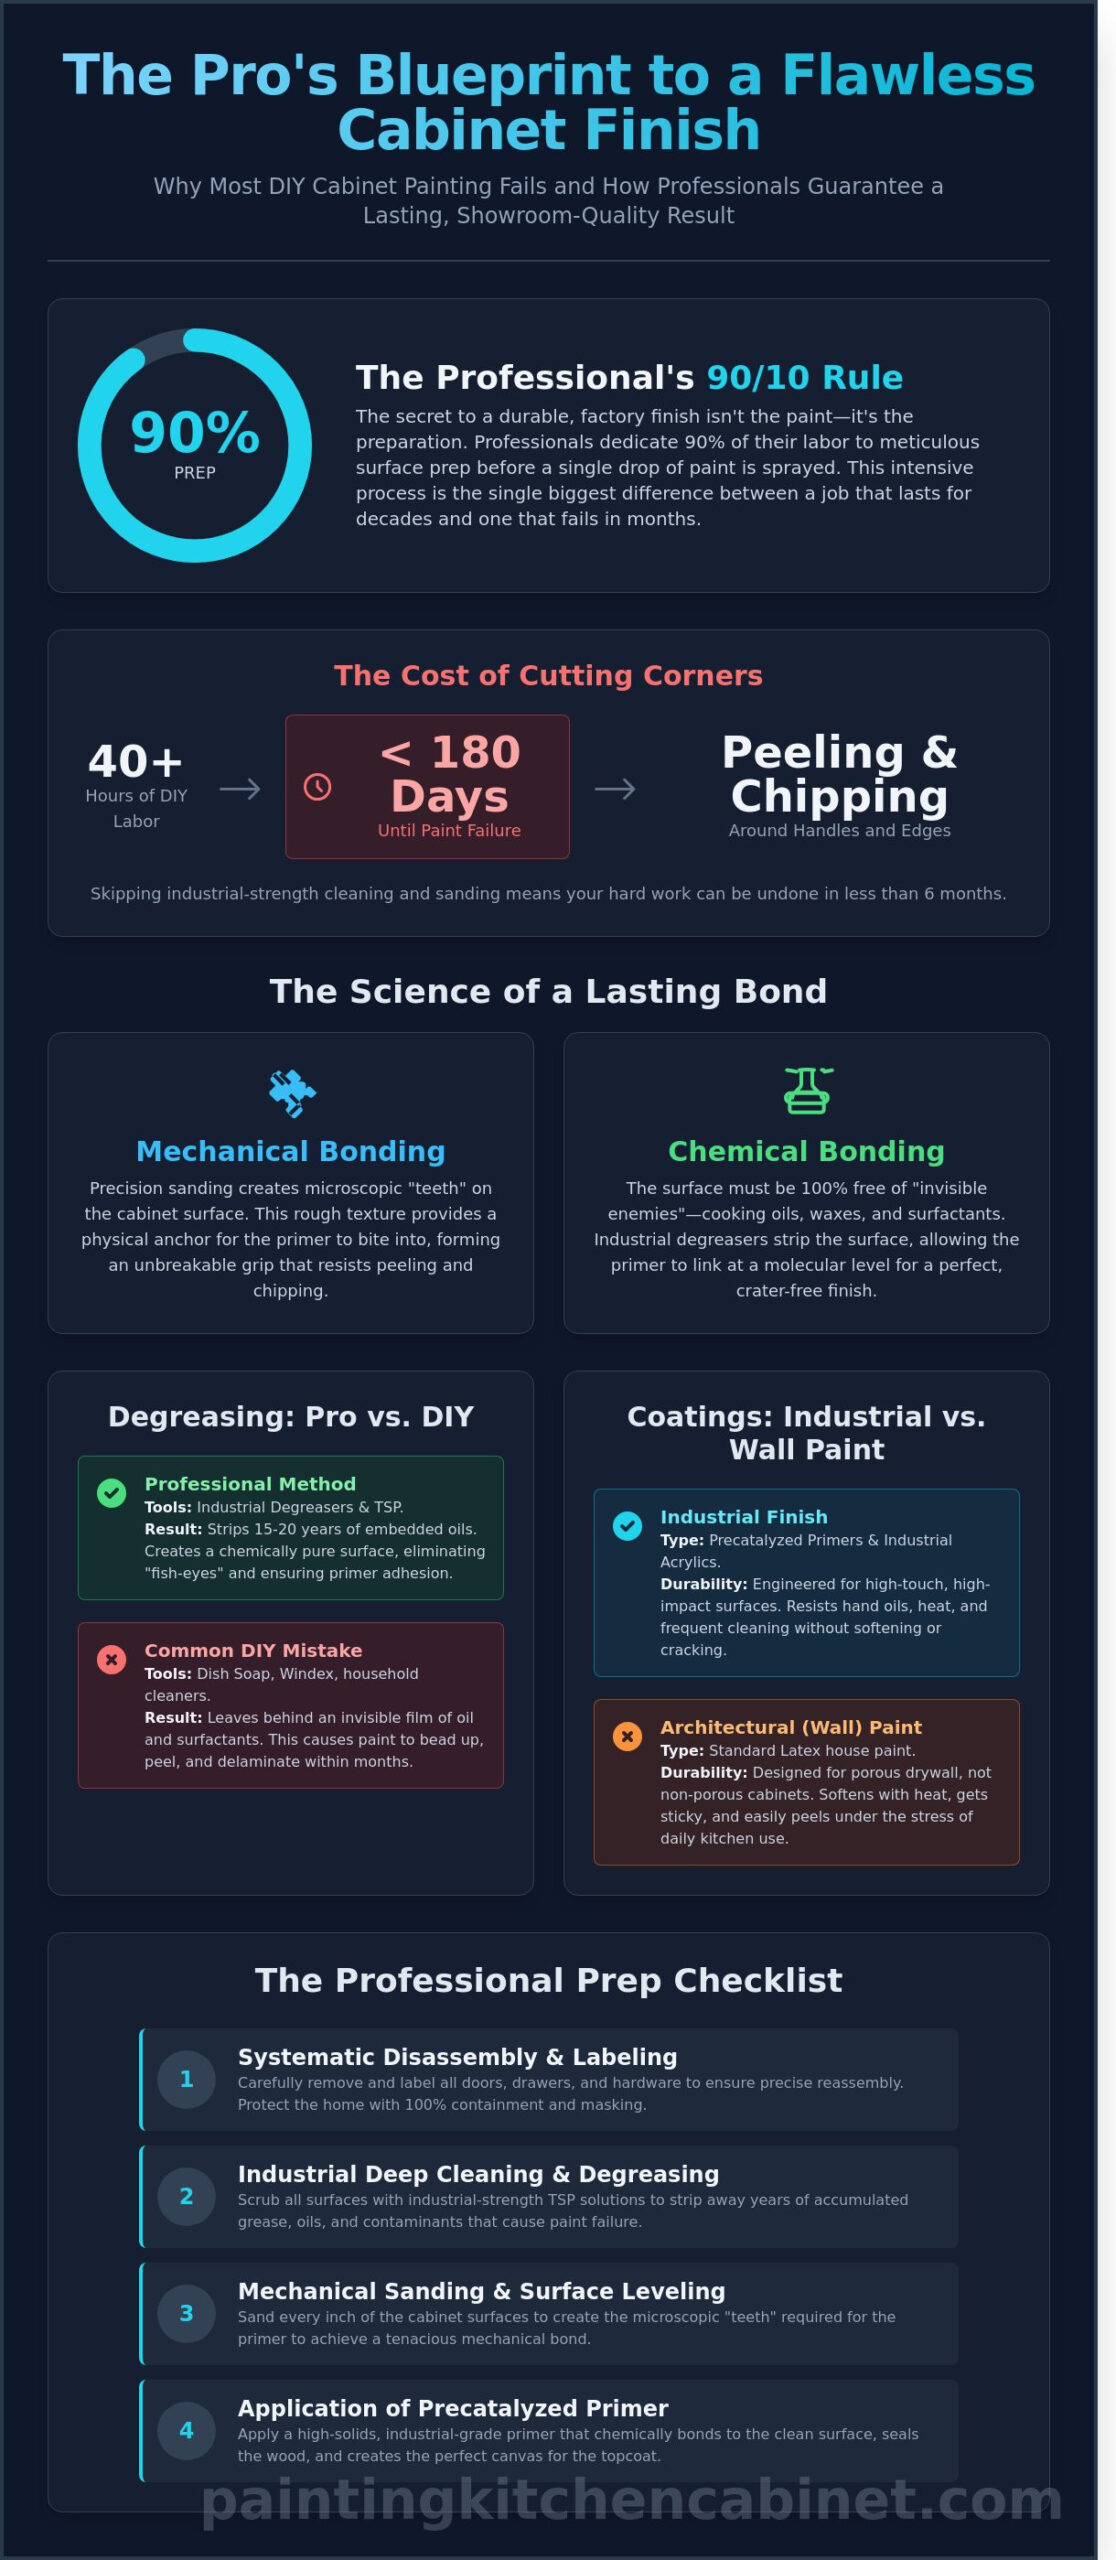
Most DIY cabinet paint jobs fail within 180 days because the homeowner skipped the industrial-strength cleaning and sanding steps that define a professional result. It’s a frustrating reality; you spend 40 hours of your weekend working, only to see the paint peel around the handles by the following season. You’re likely feeling overwhelmed by the labor involved and confused about whether you need to sand every inch or if a liquid deglosser is a shortcut you can trust. We understand that fear because at Painting Kitchen Cabinets Denver, we see the results of amateur shortcuts every week.
This guide provides the exact, labor-intensive steps used by seasoned craftsmen to guarantee your kitchen looks like it came straight from a showroom. You’ll learn how to prep cabinets for painting using the same mechanical bonding techniques and precatalyzed primers we’ve perfected over 45 years of experience. We’re going to break down the professional difference between simply cleaning and achieving a true factory finish. By the end of this article, you’ll have the confidence to tackle the preparation process the right way, ensuring your finish remains durable and smooth without any risk of cracking or failure.
Key Takeaways
- Understand the “90/10 Rule” and why professional prep is a labor-intensive process of mechanical and chemical surface alteration.
- Identify why common household cleaners are insufficient for removing the oils and proteins that cause cabinet paint to fail.
- Master the specific sanding techniques for how to prep cabinets for painting to create the perfect canvas for industrial coatings.
- Learn the systematic labeling and containment methods used to protect your home and ensure a precise, professional result.
- Discover why industrial precatalyzed primers are the only way to achieve a true, durable factory finish that resists cracking.
Why Prep Work is the Most Vital Factor in Cabinet Painting
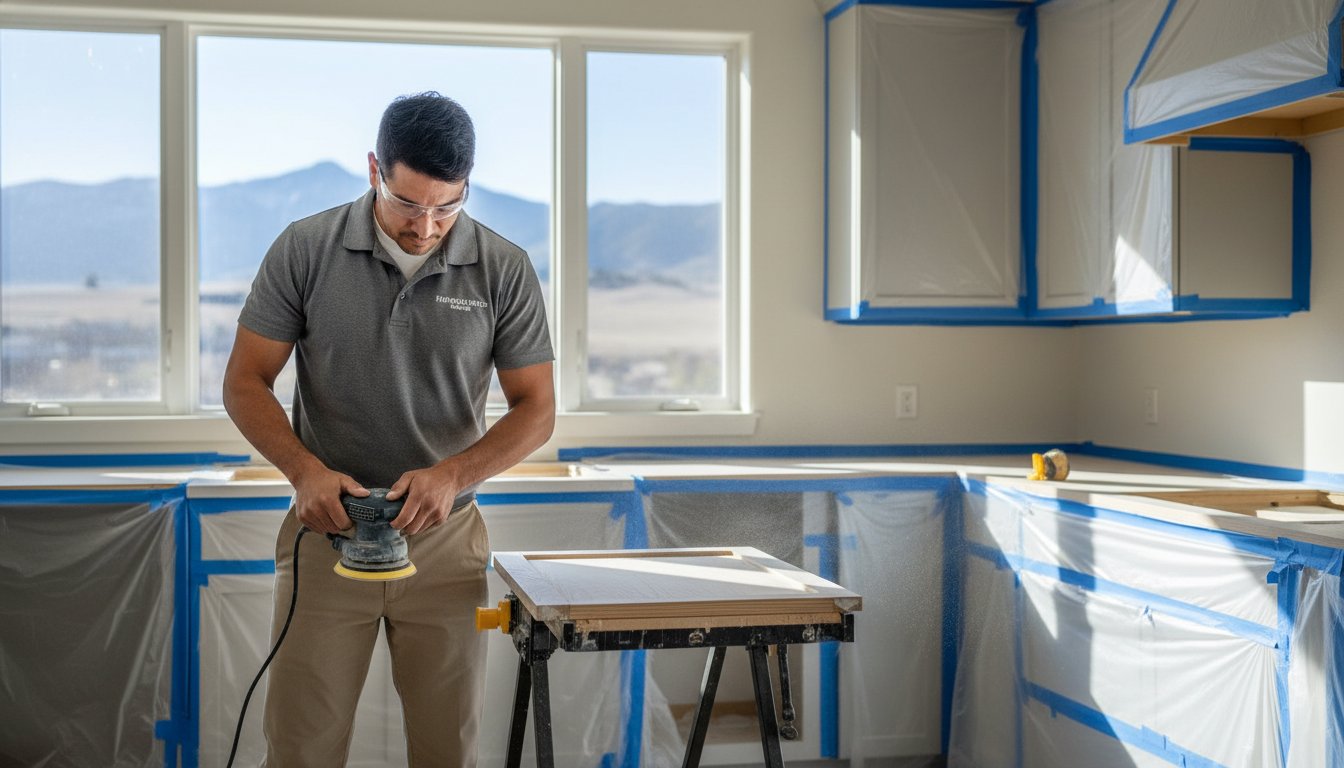
Professional preparation is the mechanical and chemical alteration of a surface to accept industrial coatings. It’s not just a quick wipe down. At Painting Kitchen Cabinets Denver, we live by the “90/10 Rule.” This means 90% of our labor happens before a single drop of paint is sprayed. When homeowners ask how to prep cabinets for painting, they often underestimate the technical requirements. Taking shortcuts leads to peeling, “fish-eyes” in the finish, or cracking at the wood joints within 6 months of completion. Amateur house painters often fail because they treat kitchen cabinetry like porous drywall. Cabinets are high-touch, high-grease surfaces that require a different level of mastery to achieve a durable, factory finish.
The Science of Adhesion: Chemical vs. Mechanical
Adhesion is a two-part process. Mechanical bonding works by creating microscopic “teeth” through precision sanding. This provides a physical anchor for the primer to bite into. Chemical bonding requires the surface to be 100% free of surfactants, waxes, and cooking oils. By understanding paint composition, we know that binders need a clean substrate to link properly at a molecular level. High surface tension from leftover cooking grease causes the paint to bead up. This creates “craters” or “fish-eyes” that ruin the look of the final coating. Without both types of bonding, the coating will eventually delaminate from the wood.
Cabinet Prep vs. General House Painting
General house painting methods don’t work in a kitchen. Using cheap latex products on cabinets is a recipe for disaster. We use industrial-strength acrylics and precatalyzed primers that are far more durable than standard wall paint. The difference is clear:
- Coating Type: Wall paint is an architectural coating; cabinet paint is an industrial finish designed for high impact.
- Application Prep: Professional spray prep requires 100% containment and masking of the kitchen. This is far more intensive than rolling a bedroom wall.
- Durability: Industrial finishes resist hand oils and heat, while latex softens and peels under similar stress.
Knowing how to prep cabinets for painting involves understanding that wood expands and contracts with Colorado’s humidity shifts. Without the right mechanical prep, the finish will crack at the stiles and rails. We’ve spent over 45 years perfecting this process to ensure your kitchen stands up to daily use and frequent cleaning.
Deep Cleaning & Degreasing: Beyond Soap and Water
Painting Kitchen Cabinets Denver knows that the biggest failure in any cabinet refinishing project starts with what you can’t see. Cooking oils and skin proteins are the “invisible enemy” of a factory finish. These contaminants soak into the wood fibers over 15 to 20 years of kitchen use. If you don’t remove every trace of grease, the paint will not bond. It will peel off in sheets within months. Painting Kitchen Cabinets Denver understands how to prep cabinets for painting using industrial-strength protocols that go far beyond a simple wipe-down.
Many DIY guides suggest using Dawn dish soap or Windex. Professional cabinet refinishing requires more power. Household cleaners are designed to remove surface grime, not deep-seated oils. We use industrial degreasers and TSP (Trisodium Phosphate) to strip the surface down to its original state. This is a critical part of how to prep cabinets for painting for a long-lasting result. If the surface isn’t chemically clean, the most expensive primer in the world will fail.
Understanding the wood finishing science behind surface tension is vital for a durable bond. If the surface energy of the wood is lower than the paint, the coating will bead up or fail to adhere properly. This is why we focus heavily on the areas around the stove and hood. These spots collect 80 percent of the grease in a kitchen. High-touch areas like handles and drawer edges also carry oils from skin that prevent primer from sticking.
The Professional Degreasing Process
We use a heavy-duty abrasive pad with a concentrated TSP solution to break down old finishes and oils. You must scrub until the “slick” feeling is gone. It’s a labor intensive process that requires multiple passes. You must neutralize the surface with clean water afterward. If you leave chemical residue behind, it will react with the primer and cause bubbling. You know it’s ready when the surface is “squeaky clean.” Run your finger across the wood; it should drag, not slide.
Dealing with Hidden Contaminants
Wax buildup from products like Murphy’s Oil Soap or Pledge is a nightmare for painters. These silicone-based residues cause “fish-eye” craters in the finish. These are small circular voids where the paint literally runs away from the contaminant. We use specialized solvents like denatured alcohol or lacquer thinner to strip away 40 years of kitchen history. This ensures a smooth, flat surface that looks like it came from the factory. If you want your project handled by experts, you can text us pictures of your kitchen for an accurate price immediately.
Sanding and Surface Leveling: Creating the Perfect Canvas
Painting Kitchen Cabinets Denver understands that sanding is the most labor intensive part of a professional Cabinet Refinishing project. Many homeowners fall for the “No-Sand” myth promoted by big box stores selling liquid deglossers. These chemicals are a supplement, not a replacement. A liquid deglosser cleans the surface; however, it does not create the mechanical profile required for precatalyzed primers to bond. If you want a factory finish that lasts 15 years, you have to pick up the sandpaper. Skipping this step is the primary reason why DIY projects fail within the first 12 months.
When you are learning how to prep cabinets for painting, you must select the right grit. We find the 100 to 150 grit range is the sweet spot for initial prep. It is aggressive enough to cut through old polyurethane but fine enough to avoid gouging the wood. Different materials require different approaches. Solid oak has deep, open pores that often need a grain filler after the first sand. Maple is much denser and requires a lighter touch to avoid burning the wood. MDF is a different beast entirely. It is highly absorbent; over-sanding can expose the fibers and cause the material to swell like a sponge. We have seen amateur house painters ruin entire kitchens by using the wrong pressure on these sensitive materials.
The Professional Sanding Sequence
Our sequence starts with a thorough 120 grit sanding to break the existing seal. Once the first coat of industrial strength primer is dry, we perform a scuff sand using 220 grit paper. This is a critical step. It levels out any raised grain and removes “nibs” or small imperfections. You must scuff sand between every single coat of primer and paint to ensure maximum adhesion. We use flexible sanding sponges for intricate moldings and details. This prevents rounding over the sharp edges that give cabinets their high-end look.
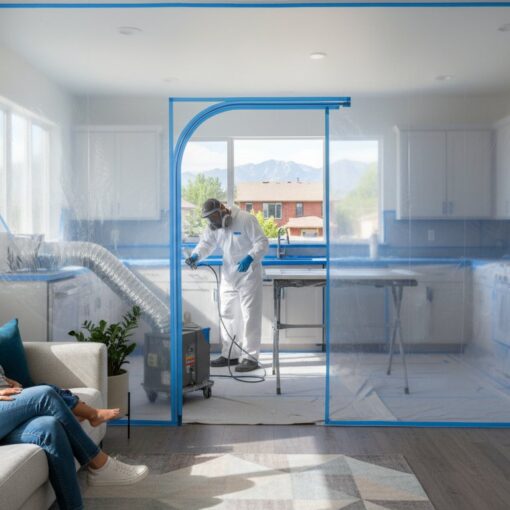
Dust Management and Surface Neutralization
A single speck of dust can ruin a spray-applied finish. Painting Kitchen Cabinets Denver maintains a surgical environment during every job. We do not just wipe the wood with a damp rag. We use a three-step neutralization process to ensure zero debris remains. First, we use compressed air at 90 PSI to blow out the dust from every corner and crevice. Second, we vacuum the entire area using HEPA filtration to capture 99.7 percent of airborne particles. Finally, we use a high-quality tack cloth to pull the remaining microscopic debris from the surface. This level of detail is why our finishes feel like glass and outperform standard house paint.
The Professional Prep Checklist: A Step-by-Step Guide
Learning how to prep cabinets for painting correctly is what separates a DIY attempt from a true factory finish. At Painting Kitchen Cabinets Denver, we treat every kitchen like a controlled laboratory environment. This phase of the project is labor intensive and requires a level of detail that amateur house painters often skip. We have refined this checklist over 45 years to ensure your finish never peels or chips.
Hardware and Labeling Systems
You must remove every door, drawer front, and piece of hardware before the first drop of primer touches the wood. We use a systematic numbering process where each door receives a specific ID tag hidden under the hinge plate. Never mix up your hinges. Even a 1/32 inch difference in a hinge’s wear pattern can cause alignment issues during reinstallation. We store all screws and pulls in organized, labeled containers to ensure every piece returns to its exact original footprint. This prevents the frustration of crooked doors that won’t close properly once the job is done.
Masking for a Professional Spray Environment
Creating a spray booth effect inside your home is the only way to achieve a flawless surface while protecting your property. We use 1.5 mil high-density plastic and heavy-duty builder’s paper to seal off the kitchen from the rest of the house. Every inch of your countertops, flooring, and appliances stays covered. We use 3M ScotchBlue or FrogTape to create razor-sharp lines where the cabinet boxes meet the walls. This containment strategy manages overspray and ensures that dust from the rest of your home doesn’t land on your wet finish. It’s a technical process that turns a standard kitchen into a professional finishing shop.
Repairs and Caulking
We inspect every rail and stile for “battle scars” like deep scratches, dents, or open wood grain. We don’t use standard spackle. We use industrial wood fillers or two-part epoxy fillers that won’t shrink over time. When it comes to seams, we avoid the cheap latex caulking found at big-box stores. Cheap caulk can shrink by 25 percent as it dries, leading to unsightly cracks in your new finish. We apply high-performance, elastomeric materials that move with the wood. Our “less is more” approach ensures the caulk fills the gap without creating a bulky, rounded bead that screams “amateur.”
If you want a professional result without the stress of doing it yourself, text us the number of doors and drawers with pictures and we can get you an accurate price immediately.
Why Professional Spray Prep Beats DIY Efforts
The gap between a DIY effort and a professional result is massive. Most homeowners start a project thinking a “painted look” is enough, but they quickly realize that kitchen cabinets require more than just a fresh color. A true factory finish is about durability and surface tension. Painting Kitchen Cabinets Denver has spent over 45 years refining a process that ensures your cabinets don’t just look good on day one, but stay perfect for 15 years or more. Mastering how to prep cabinets for painting requires an understanding of wood chemistry and industrial equipment that most amateurs simply don’t have.
Industrial Coatings vs. Consumer Paint
The products you find at a local big-box store are designed for general use, not for the high-traffic environment of a kitchen. We use industrial precatalyzed primers that are specifically engineered to “bite” into the wood grain. This chemical bond is what prevents peeling and chipping. Our industrial acrylics offer 100% moisture and grease resistance, standing up to the daily abuse of cooking oils and steam. Consumer-grade paints often soften or become “sticky” when exposed to kitchen grease over a period of 12 months. Our finishes cure to a rock-hard surface that handles heat and cleaning chemicals without failing.
The Value of Professional Experience
A DIY cabinet project often ends in frustration. We see it all the time; homeowners spend three weeks painting only to have the finish start peeling after six months because the prep work wasn’t handled correctly. Our team treats every job as a labor-intensive mission. We put in 40 to 80 man-hours of work to ensure every surface is cleaned, de-glossed, and sanded to perfection. You can see the results of this dedication in our guide to Expert Cabinet Painting in Denver. We save you the weeks of labor and the risk of a ruined kitchen.
- Professional sprayers provide a smooth, mirror-like finish without brush marks or roller texture.
- Industrial primers block tannins and stains that bleed through consumer paint within 30 days.
- Our 45 years of experience means we know exactly how to prep cabinets for painting regardless of the wood species or existing finish.
- We follow a strict protocol outlined in our Cabinet Refinishing Guide.
Don’t settle for a finish that looks like a weekend hobby project. Painting Kitchen Cabinets Denver provides a high-quality, durable result that increases your home value. The process is simple and transparent. You can text us the number of doors and the number of drawers with pictures, and we can get you an accurate price immediately. We take the guesswork out of your kitchen remodel and deliver a factory finish that lasts for decades.
Get the Professional Factory Finish Your Kitchen Deserves
Mastering how to prep cabinets for painting isn’t about shortcuts; it’s about a labor intensive process that includes deep degreasing and precision sanding to create a perfect canvas. Amateur house painters often skip these steps or use cheap latex products that fail within a year. Our team at Painting Kitchen Cabinets Denver brings over 45 years of professional cabinet refinishing experience to every job. We don’t use brushes or rollers. We use a zero-brush, zero-roller spray application to ensure a flawless surface every time. We only use industrial-strength acrylics that provide a durable factory finish better than any DIY effort. This professional approach ensures your cabinets look brand new and stand up to daily wear for years. You don’t have to settle for a messy, hand-painted look when a professional finish is within reach. Your kitchen is the heart of your home, so treat it to a finish that lasts.
Text us your door and drawer count with pictures for an immediate quote!
Frequently Asked Questions
Do I really need to sand my cabinets if I use a “no-sand” primer?
Yes, you must sand your cabinets even if the primer label says it’s not required. A quick scuff sand with 220-grit sandpaper creates the mechanical bond needed for a long-lasting finish. Without it, the paint can peel in 12 months or less. Painting Kitchen Cabinets Denver always performs this labor intensive step to guarantee a factory finish that won’t chip under daily use.
How do I clean my kitchen cabinets before painting to ensure the paint sticks?
Clean your cabinets using an industrial strength degreaser like Trisodium Phosphate mixed at a ratio of 0.5 cups per gallon of water. This process removes 100% of the grease, oils, and wax buildup that accumulate over years of cooking. You should scrub every square inch with a green abrasive pad to ensure the surface is chemically clean before you begin how to prep cabinets for painting.
Is it better to remove the cabinet doors or paint them while they are hanging?
You should always remove cabinet doors and drawers to paint them horizontally in a controlled environment. Painting them while hanging leads to drips, sags, and missed spots around the hinges. We remove 100% of the hardware and hinges to ensure every edge receives a consistent coat of industrial coating. This professional approach is the only way to avoid the amateur look of painted-over hinges.
What kind of primer is best for kitchen cabinets with a heavy wood grain?
A high-solids, solvent-based primer or a precatalyzed primer is the best choice for heavy grain woods like oak. These products fill the deep pores of the wood grain better than standard water-based options. Using an industrial strength primer ensures the grain doesn’t telegraph through the final topcoat. It provides a flat, stable base for the 2 coats of finish paint required for a durable result.
Should I use a brush or a sprayer for the best finish on my prepped cabinets?
Use an airless sprayer with a fine finish tip to achieve a smooth finish that looks like it came from the factory. Brushes and rollers leave textures and marks that scream DIY project to anyone looking at the kitchen. A sprayer applies the coating at a consistent thickness of 4 to 5 mils; this is necessary for the durability and appearance of high-end Cabinet Refinishing.
How long does the preparation process usually take for a standard kitchen?
Preparation for a standard 25 door kitchen usually takes 16 to 24 man-hours of labor. This timeline includes cleaning, masking, sanding, and priming before the first drop of finish color is applied. In our 45 years of experience, we’ve found that 70% of the work happens before the final painting begins. Rushing this stage leads to failures that cost 2 times as much to fix later.
Can I paint over cabinets that have already been painted once before?
You can paint over previously painted cabinets if the existing coating is stable and not peeling. You must sand the old paint with 180-grit paper to level the surface and remove any brush marks from the previous job. If the old paint is failing on more than 15% of the surface, it must be stripped or sanded down to the original wood to ensure the new bond holds.
What happens if I don’t remove all the grease before I start priming?
Primer will not stick to grease, which causes the paint to bead up or “fish eye” immediately upon application. Even a small amount of skin oil around the handles can cause the finish to peel within 90 days. This is why learning how to prep cabinets for painting correctly is the most vital factor in the entire project. Skipping the degreasing step results in a total finish failure.
