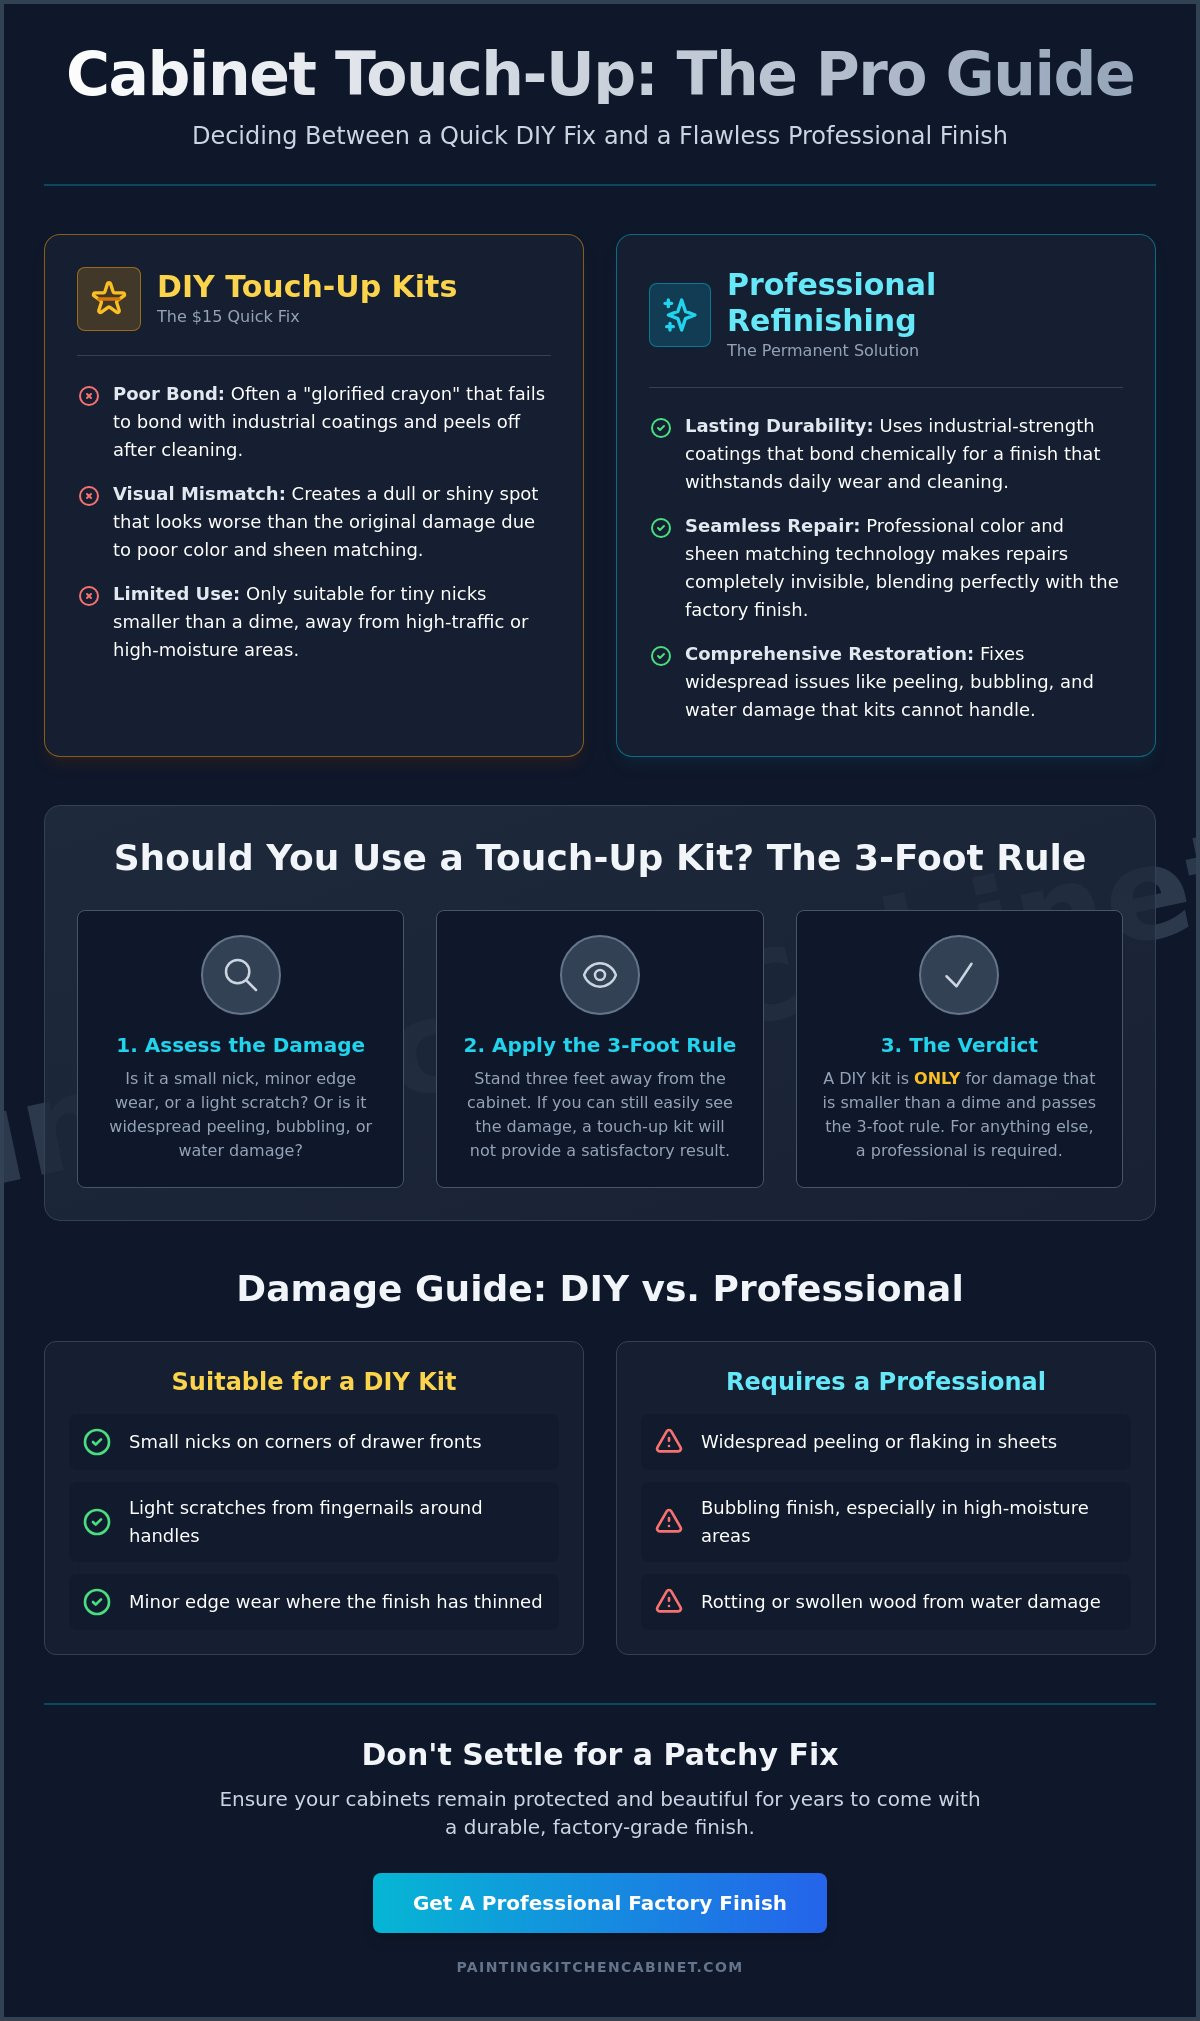
A $15 retail store touch up kit is often just a glorified crayon that fails to bond with industrial strength coatings. If you have visible scratches on high-traffic cabinet doors, using a low-quality painted cabinet touch up kit creates a dull spot that looks worse than the original damage. We’ve seen these amateur results for over 45 years in the cabinet refinishing industry. You’re right to worry about the color matching or the sheen being off. A kitchen is a high-impact environment where cheap latex solutions simply don’t hold up against daily wear. You want a seamless repair that blends perfectly with your original factory finish without peeling off after just a few cleanings.
This guide explains how to select the right tools for minor nicks and how to perform the prep work necessary for a lasting bond. You’ll learn the technical difference between a temporary retail fix and a permanent industrial restoration. We’ll show you exactly when to put down the DIY kit and call for a professional factory-grade finish that provides the long-lasting durability your kitchen requires. It’s about doing the job the right way to ensure your cabinets remain protected and beautiful for years to come.
Key Takeaways
- Identify when minor nicks and edge wear are suitable for a quick fix and when the damage requires a more robust, professional solution.
- Compare the technical performance of pens, fill sticks, and solvent-based tools to choose the most effective painted cabinet touch up kit for your specific cabinet substrate.
- Learn the critical importance of professional de-greasing and color testing to ensure your repairs blend seamlessly without a visible sheen mismatch.
- Discover why widespread peeling and Colorado’s harsh, dry climate often necessitate an industrial-strength factory finish rather than a temporary DIY fix.
What is a Painted Cabinet Touch Up Kit and When Should You Use One?
A painted cabinet touch up kit is a collection of professional grade tools designed to hide minor damage on your kitchen cabinets. Painting Kitchen Cabinets Denver has seen thousands of kitchens where small nicks or edge wear make an otherwise perfect kitchen look aged. These kits are not meant for structural restoration; they are designed for camouflage. You use them to blend small imperfections back into the factory finish so they don’t catch the light or the eye. Most kits are specific to the original manufacturer’s paint code. This is critical because there are over 200 shades of white used by major cabinet brands. Using the wrong kit will result in a polka dot effect that looks worse than the original scratch.
The science of Wood finishing dictates that every layer of a cabinet’s surface serves a purpose. A painted cabinet touch up kit attempts to replicate the final aesthetic layer of that process. You should only reach for a kit when the damage is smaller than a dime. If you are dealing with edge wear or a light surface scratch, these tools work well. If the paint is peeling in sheets or the wood underneath is rotting from water damage, a kit is a waste of money. Real craftsmanship requires knowing when a minor fix is enough and when a full cabinet refinishing project is necessary.
The Anatomy of a Standard Touch Up Kit
A complete kit usually contains three main components. Felt tip markers are used for light surface scratches and edge blending. Fil-Stiks, which are specialized wax sticks, fill in deeper gouges or nail holes. Small paint vials with brush applicators handle larger nicks where the paint has chipped away entirely. A high quality painted cabinet touch up kit also includes a clear coat or topcoat pen. This is the most vital factor because it seals the repair and ensures the sheen matches the rest of the door. Without a matching topcoat, your repair might look dull or too shiny compared to the surrounding area.
Identifying “Touch-Up Ready” Damage
Professional painters use the Three-Foot Rule to decide if a kit is appropriate. If you can still see the damage while standing three feet away from the cabinet, a touch-up kit won’t provide a satisfactory result. These kits often fail in high moisture areas like the sink base cabinet or near the dishwasher. Moisture causes the wood to swell, which breaks the bond of the touch-up paint. You should look for specific types of damage:
- Small nicks on the corners of drawer fronts.
- Light scratches from fingernails or jewelry around handles.
- Minor edge wear where the factory finish has thinned.
- Tiny pinholes from cabinet hardware installation.
If the finish is bubbling or flaking off in pieces larger than 10 millimeters, you aren’t looking at a touch-up job. You are looking at a failure of the original coating that requires professional sanding and repainting. Our company is based on quality work at affordable prices, and that starts with an honest assessment of whether a kit can actually fix the problem.
Comparing the Tools: Pens, Fill Sticks, and Touch-Up Paint
Choosing a painted cabinet touch up kit requires understanding that not all tools handle cabinet substrates the same way. We’ve spent over 45 years in the industry, and we know that a factory finish is difficult to replicate with a simple retail marker. Industrial-strength acrylics and pre-catalyzed lacquers used in professional shops have a chemical makeup that retail products can’t match. If your sheen level is off by even 10 percent, the repair will stand out. Whether you have matte, satin, or semi-gloss cabinets, the light reflects differently on each surface. If you’re worried about the quality of a local contractor’s work, it’s smart to avoid a home improvement scam by checking their references and process before they touch your kitchen.
Most retail kits use thin dyes or low-solids paint. These don’t provide the film thickness needed to hide the underlying wood grain or primer. Professional results require tools that match the specific chemistry of your existing coating. We always recommend testing a small, inconspicuous area first. If the damage is widespread, it’s often better to look into professional cabinet refinishing rather than trying to dot your way through a failing finish.
Touch-Up Pens and Markers
Touch-up pens are best for light edge wear and shallow surface scratches. These markers use a fast-drying stain or paint that’s easy to control. However, they carry a high risk of “halo” effects. This happens when the ink bleeds into the surrounding paint, creating a dark ring around the scratch. You can minimize this by layering the ink. Apply a light coat, wait 20 seconds, and dab it with a clean cloth to blend. Repeat this until the color matches. It’s a quick fix, but it won’t fill a physical gap in the wood.
Fill Sticks and Burn-In Tools
For deep gouges and nail holes, a wax-based fill stick is the standard choice. You rub the stick over the hole until it’s packed full. The most vital step is leveling the wax. Use a plastic scraper or an old credit card to shave off the excess wax until it’s flush with the door. Don’t use metal scrapers because they’ll scratch the surrounding finish. Wax sticks aren’t ideal for high-traffic areas near handles. Frequent cleaning with degreasers can melt or pull the wax out of the hole over time.
Brush-In-Cap Paint Bottles
Liquid paint bottles are necessary when a nick is deep enough to require specific film thickness. These kits usually provide a more durable bond than wax or markers. The challenge is avoiding brush marks. A factory-sprayed surface is perfectly flat, and a thick brush stroke will catch the light. Use a micro-brush or a toothpick to drop the paint into the nick rather than brushing it on. If you find that your cabinets are peeling or the paint is failing on more than 20 percent of the surface, a painted cabinet touch up kit won’t be enough. You can text us the number of doors and drawers with pictures to Painting Kitchen Cabinets Denver to see if a full refinish is a better long-term investment.
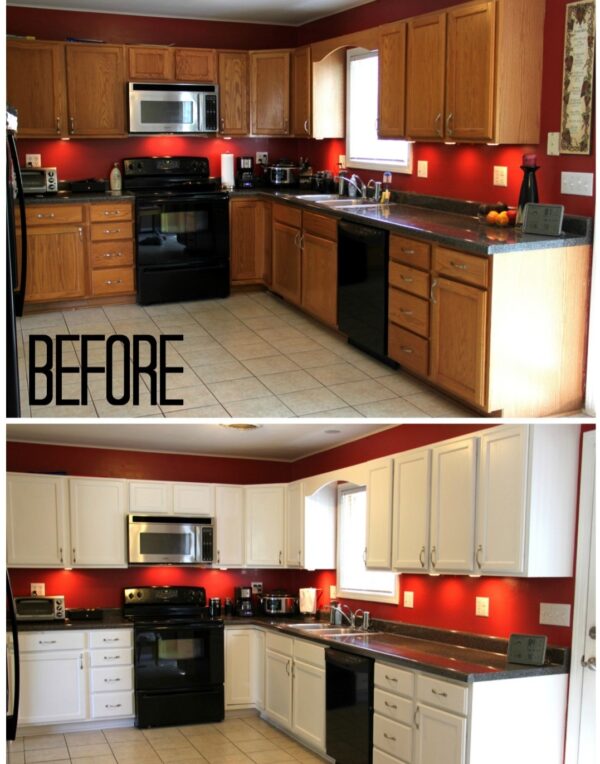
DIY Kits vs. Professional Cabinet Refinishing
Buying a $25 painted cabinet touch up kit feels like an easy win, but the reality of industrial chemistry says otherwise. These kits are designed for minor aesthetics, not for the high-traffic environment of a kitchen. The biggest issue is the sheen mismatch. Factory finishes are measured precisely on a gloss scale, often landing at a specific 15 percent satin or 30 percent semi-gloss. A generic kit rarely matches this, creating “hot spots” where the light hits the repair and highlights the patch. Professional spraying provides a glass-like smoothness. No brush or foam applicator in a kit can mimic the 0.5 millimeter thickness of a perfectly atomized industrial coating.
The cost-benefit analysis of DIY repairs often reveals a hidden deficit. If you spend 15 hours prepping and dabbing a kit only to have the paint peel within six months, you’ve lost both time and money. Professional refinishing involves a labor-intensive process that ensures the finish stays put. When you calculate the price of multiple kits and the eventual need for a professional fix, the “cheap” $20 solution ends up costing 300 percent more in the long run. Real value comes from a finish that doesn’t require constant maintenance.
The Chemistry of the Finish
Retail kits use standard latex or thin enamels that dry by evaporation. Professional finishes use precatalyzed primers that undergo a chemical cross-linking process as they cure. This creates a permanent seal that bonds directly to the wood fibers. Amateur house painters fail 90 percent of the time because they use “cheap” retail products that don’t bite into the surface. Without that industrial bond, the paint will eventually bubble or flake away. Our industrial coatings reach a 2H pencil hardness, providing a shield that retail paints simply can’t offer.
Long-Term Durability and Maintenance
Maintenance is where the difference becomes obvious. A painted cabinet touch up kit often reacts poorly to common kitchen oils and cleaners. Within 24 months, these patches can become gummy or discolored. Industrial-grade finishes are tested against 24-hour exposures to substances like lemon juice, vinegar, and mustard. A cabinet painting denver professional ensures the entire surface is protected by a finish that lasts a decade. If you have to re-apply a kit every year, you’re wasting money and risking the integrity of your cabinetry. Using non-industrial products leads to yellowing or cracking as the house settles and temperatures fluctuate, while factory-grade finishes remain flexible and durable.
Step-by-Step: How to Apply a Touch Up Kit Like a Pro
At Painting Kitchen Cabinets Denver, we’ve seen that 90 percent of a professional finish happens before a brush ever touches the wood. You can’t just wipe a cabinet with a wet rag and expect a painted cabinet touch up kit to bond correctly. Kitchens are harsh environments filled with aerosolized grease, cooking oils, and waxes that cause new paint to peel or fish-eye. Professional results require professional discipline.
Preparation: The Most Vital Factor
Cleaning is the non-negotiable first step. Use an industrial strength de-greaser like TSP or a dedicated cabinet cleaner to strip away every trace of contaminants. Soap and water won’t cut through the chemical buildup found near stoves. Once the surface is clean, use 320 grit sandpaper to lightly scuff the area. This creates “tooth” for the paint to grab. Prep work is the foundation of any cabinet project.
Application and Blending Techniques
Always test your painted cabinet touch up kit on the back of a door before hitting the front panels. Factory finishes often shift in color after 5 to 10 years of UV exposure, so you need to verify the match in your specific kitchen lighting. Use a dabbing or stippling motion rather than a traditional stroking motion with the brush. Strokes leave visible ridges that catch the light, while dabbing mimics the texture of a factory spray finish.
- Feather the edges: Use a lint-free cloth to lightly tap the perimeter of the wet repair.
- Less is more: Apply thin layers. Thick globs of paint take longer to dry and create a noticeable “patch” look.
- Dry time: Allow the paint to sit for at least 4 hours before considering a second coat.
Sealing the Repair
Once the color is dry, you must evaluate the sheen. Most factory finishes are satin or semi-gloss, and the repair will stand out if the light reflects off it differently. If your kit includes a clear topcoat, apply it sparingly to provide industrial strength protection against moisture. A common mistake is closing the door or drawer too soon. This leads to “blocking,” where the paint sticks to the cabinet frame and tears off when you next open the door. Give the repair a full 24 hours to cure before resuming normal kitchen use.
If your cabinets need more than a simple patch, text us the number of doors and drawers with pictures to get an accurate price for a full professional refinish immediately.
When the Kit Fails: Professional Restoration in Denver
A painted cabinet touch up kit is a great tool for a single nick or a small scratch. It is not a permanent solution for widespread finish failure. When you start seeing paint peeling on multiple doors or along the edges of your drawers, your cabinets have moved beyond simple DIY repairs. These signs indicate that the original bond between the paint and the wood is failing. No pen or small bottle of paint can restore the structural integrity of a failing finish.
Colorado’s environment is particularly harsh on wood surfaces. Our state has a notoriously dry climate where humidity levels frequently drop below 15 percent. This lack of moisture causes wood to shrink. When the seasons change, the wood expands again. This constant movement puts immense stress on the paint film. Over time, the paint loses its flexibility and starts to crack at the joints. Painting Kitchen Cabinets Denver has spent over 45 years witnessing how this cycle destroys standard retail finishes. We provide a level of durability that a store-bought kit simply cannot offer.
Recognizing Structural Paint Failure
You need to look for “spiderweb” cracking around the joints of your cabinet doors. This fine network of cracks tells you the finish is becoming brittle and is no longer adhering to the substrate. Another major red flag is water damage at the base of your cabinets or near the sink. When water gets under the paint, the wood or MDF swells. A touch-up pen cannot fix swollen wood grain or localized rotting. There is a massive difference between a quick “paint job” and a professional cabinet painting restoration. Our process involves labor-intensive preparation and industrial-strength primers to ensure the new finish actually lasts.
The Denver Advantage: Local Expertise
We achieve a factory-like finish because we never use brushes or rollers on your cabinet frames. We only use professional spray applications. This eliminates brush marks and provides a smooth, hard surface that resists future chipping. Our team serves the entire Denver Metro area, providing expert service from Castle Rock to Thornton. We use industrial-strength acrylics and precatalyzed primers designed for the specific challenges of the Colorado climate. These materials are much stronger than the air-dry paints found in a standard painted cabinet touch up kit.
If your cabinets are peeling or the finish is wearing thin, stop guessing with DIY kits. We make the estimation process simple for every homeowner. You can text us the number of doors and the number of drawers along with a few pictures of your kitchen. We will provide you with an accurate price immediately. Get a real solution that brings your kitchen back to life with a durable, factory finish.
Restore Your Denver Kitchen to a Factory Finish Today
A painted cabinet touch up kit is a practical tool for hiding minor 1/8 inch nicks or surface scratches on your doors. You’ve learned that choosing between pens and fill sticks depends on the depth of the damage, but these retail products can’t replace a true industrial coating. For larger areas or peeling paint, DIY methods often leave visible brush marks and texture differences that ruin the look of your kitchen. Real durability requires professional preparation and the right materials to ensure the finish doesn’t fail within months.
Painting Kitchen Cabinets Denver brings 45+ years of cabinet refinishing experience to every job we handle. We don’t use hardware store paint or amateur techniques; our team relies on industrial-strength spray-applied acrylics to deliver a smooth, factory-quality finish. We guarantee a surface free of brush or roller marks because we focus on the labor intensive prep work that makes a kitchen last. If your cabinets need more than a quick fix, text us photos of your cabinets for an immediate restoration quote! We’re ready to help you get the beautiful kitchen you deserve.
Frequently Asked Questions about Cabinet Touch-Ups
Do cabinet touch-up kits work on all types of paint?
No, they don’t work on every surface because factory finishes often use industrial-strength precatalyzed lacquers. If you apply a standard latex kit over a conversion varnish used in 85% of modern cabinets, it won’t bond properly. You need a kit designed for the specific chemistry of your coating. This ensures the repair doesn’t peel off within 6 months of application.
How do I find the exact color match for my kitchen cabinets?
You should check the back of a drawer box or the inside of a cabinet door for a manufacturer’s label with a paint code. If that’s missing, take a small door to a local paint store to use their spectrophotometer. This device analyzes light reflection to provide a 99% accurate color match for your painted cabinet touch up kit. It’s the only way to avoid visible patches.
Can I use a touch-up kit on cabinets that are peeling or flaking?
No, you shouldn’t use a touch-up kit on cabinets where the finish is actively failing or peeling in large sections. Touch-up kits are meant for small nicks less than 0.5 inches in size; they aren’t for structural coating failures. If more than 10% of the surface is flaking, it indicates a failure in the original prep work that requires a full professional refinish.
How long does a cabinet touch-up repair usually last?
A high-quality repair using industrial-strength materials can last 3 to 5 years under normal kitchen conditions. The longevity depends entirely on your initial prep work and cleaning the area with a degreaser first. If you skip the cleaning phase, the new paint will likely lift or chip away within 90 days due to the presence of kitchen grease and cooking oils.
Will a touch-up pen match the sheen of my semi-gloss cabinets?
Most standard touch-up pens come in a satin or semi-gloss finish, but they rarely match the exact 35 to 50 degree gloss level of a factory finish. If the sheen is off by even 5%, the repair will stand out when light hits it from an angle. You can often adjust the sheen by lightly buffing the dried paint with a 0000 grade steel wool pad.
Is it better to use a wax fill stick or liquid paint for deep scratches?
You should use a wax fill stick for deep gouges that penetrate the wood and liquid paint for surface scuffs. Wax sticks fill the physical hole and stop moisture from entering the wood, which prevents swelling in 70% of MDF cabinet cores. After you fill the gouge, you can apply a thin layer of paint from your painted cabinet touch up kit to match the finish.
What should I do if the touch-up kit makes the scratch look worse?
You must stop immediately and wipe away the wet paint with a damp cloth before it cures. If the paint has already dried, you can gently sand the area with 400-grit sandpaper to level the surface. Most DIY mistakes happen because people apply too much paint at once. This creates a visible bump that is much harder to hide than the original scratch.
How much does it cost to have a professional fix my cabinet nicks instead?
Professional refinishers usually charge a minimum service fee because the labor intensive prep work takes time regardless of the scratch size. According to HomeAdvisor data from 2023, the national average for cabinet repair services ranges between $150 and $500. For a true factory finish, Painting Kitchen Cabinets Denver recommends professional spraying over brush kits when damage covers more than 5% of the surface.