

Do dark, dated cabinets make your kitchen feel smaller and more cramped than it really is? You know a change is needed, but a full remodel is too expensive and disruptive. The good news is there is a powerful, cost-effective solution. The key to a total transformation is brightening a dark kitchen with painted cabinets, and when done correctly, the result is a flawless, factory-like finish that completely revitalizes your space.
This guide provides the direct, no-nonsense information you need to move forward with confidence. We will cover the vital factors for success, from choosing the perfect light-reflecting colors to understanding the industrial-strength finishes that guarantee durability. You’ll learn why professional prep work is non-negotiable for a result that lasts and how to avoid the common pitfalls of a DIY job. Get ready to create the bright, modern, and welcoming kitchen you deserve, without the cost and headache of a total renovation.
Key Takeaways
- The right paint color is your most powerful tool; learn how to select whites and off-whites based on their Light Reflectance Value (LRV) to maximize brightness.
- Discover why your choice of paint sheen is just as crucial as the color for reflecting light and making your kitchen feel more spacious.
- A flawless, durable finish for brightening a dark kitchen with painted cabinets depends almost entirely on meticulous professional prep work and industrial-strength coatings.
- Amplify the effect of your new cabinets with strategic updates to lighting, backsplashes, and countertops to complete the transformation.
Why Dark Cabinets Make Your Kitchen Feel Smaller and How Painting Is the #1 Solution
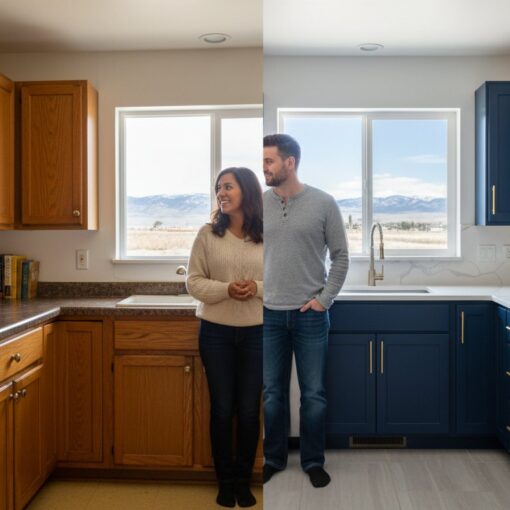
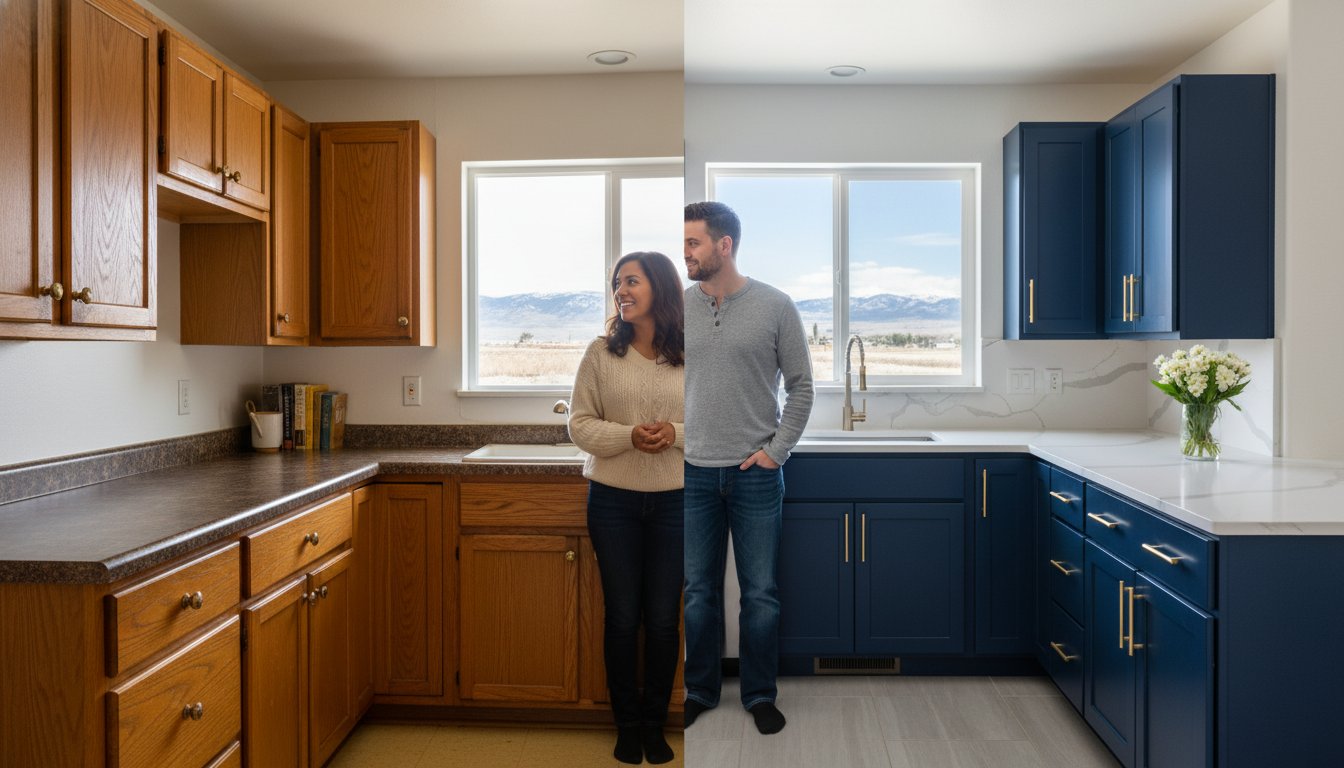
Dark cabinets, whether they are stained wood or a dated paint color, are the primary reason a kitchen feels closed-in and dim. They act like sponges for light, absorbing both natural sunlight and artificial light from your fixtures. This effect creates shadows and a heavy atmosphere in what should be a bright, functional workspace. The choice of finish is also critical; understanding the role of paint sheen in light reflection is a vital factor for maximizing brightness in your kitchen.
See this principle in action and how a lighter color can completely transform a space:

The Problem with Dark Cabinets
Dark cabinetry does more than just absorb light; it creates a series of problems that negatively impact the entire room. Here’s how they detract from your kitchen’s potential:
- They shrink the space: Dark vertical surfaces make walls feel like they are closing in, creating a cramped, cave-like effect that makes the room feel significantly smaller.
- They dull your surfaces: The lack of reflected light makes your countertops, backsplash, and even flooring appear darker and less vibrant than they actually are.
- They show everything: Contrary to popular belief, dark, solid colors often highlight dust, smudges, and fingerprints more obviously than lighter shades.
Painting vs. Refacing vs. Replacing
When considering a kitchen update, you have three main options, but professional painting is the clear winner for impact and value. A professional cabinet painting project costs just a fraction of a full replacement and is significantly more affordable than refacing, where only the doors and drawer fronts are replaced. The entire process is also completed in days, not the weeks or months a full remodel requires. By keeping your existing, durable cabinet boxes, you make a sustainable choice that reduces landfill waste. Ultimately, brightening a dark kitchen with painted cabinets offers the most dramatic visual return on your investment, completely transforming the heart of your home without the cost and disruption of a full renovation.
Choosing the Perfect Light-Reflecting Paint Color for Your Cabinets
Selecting the right paint color is the most vital factor in the process of brightening a dark kitchen with painted cabinets. The science behind this is simple: Light Reflectance Value (LRV). LRV is a scale from 0 (absorbing all light) to 100 (reflecting all light). For a dark space, choosing a paint with a high LRV is essential to bounce light around the room, creating an open and airy feel. However, a high LRV is just the starting point. To achieve a truly flawless finish, you must also consider the paint’s undertones and how they interact with your kitchen’s existing elements.
The Power of Whites and Off-Whites
White is the classic choice for maximum brightness. A crisp, pure white offers the highest LRV and creates a clean, expansive feel. For a cozier atmosphere, warm off-whites like Sherwin-Williams Alabaster have creamy undertones that feel inviting. If your kitchen has stainless steel appliances and a modern design, a cool white like Benjamin Moore White Dove provides a sleek, sharp finish that complements contemporary hardware and fixtures perfectly.
Beyond White: Light Grays and Subtle Colors
You are not limited to white to achieve a brighter space. Light grays offer a sophisticated, modern neutral that pairs exceptionally well with marble or quartz countertops. Warmer “greige” (gray + beige) tones provide brightness without feeling stark. For a touch of personality, pale blues or soft sage greens can also work, as long as they have a high LRV and a clean undertone to avoid looking muddy in low light conditions.
Matching Paint to Your Existing Elements
A professional result depends on coordination. Your new cabinet color must work with your countertops, backsplash, and flooring. The most critical step is to test samples in your actual kitchen. Paint a large poster board with your top choices and move it around the room at different times of day. This shows you exactly how the color reacts to your home’s unique natural and artificial lighting. This process guarantees you make the right decision for brightening a dark kitchen with painted cabinets and achieving a cohesive, high-end look.
More Than Just Color: Why Paint Sheen is Crucial for a Brighter Kitchen
Choosing the right white or light color is only half the battle. The paint’s sheen-its level of gloss-is a vital factor that directly impacts how light behaves in your space. A higher sheen reflects more light, instantly making a room feel larger and more open. This is a non-negotiable detail for anyone serious about transforming a dim, dated kitchen into a bright, inviting one.
The science is simple: the glossier the paint, the more light it bounces around the room. This is the secret weapon for brightening a dark kitchen with painted cabinets. However, there is a critical trade-off. High-gloss finishes are unforgiving and will magnify every tiny dent, ding, or surface imperfection. This is why professional, flawless prep work is not just recommended; it’s essential for achieving a true factory finish.
Satin Finish: The Industry Standard
For most kitchen cabinet projects, a satin finish is the industry standard for good reason. It offers a soft, elegant glow that reflects light without creating a harsh glare. More importantly, its surface is highly durable and easy to clean, resisting the scuffs and grime of daily kitchen use. Satin also has enough texture to hide minor surface imperfections far better than its glossier counterparts.
Semi-Gloss Finish: Maximum Reflection and Durability
If maximum brightness is your primary goal, a semi-gloss finish is the superior choice. It provides significant light reflection that can dramatically brighten a space. This sheen creates an extremely durable, scrubbable surface that stands up to aggressive cleaning, making it ideal for high-traffic kitchens. Be warned: this finish demands a perfectly prepped, flawless surface, as its reflective nature will highlight every single imperfection.
What to Avoid: Matte and Eggshell Finishes
While popular for walls, matte and eggshell finishes are the wrong choice for kitchen cabinets. These finishes lack the durability and cleanability required for a high-use area and will lead to a failed result.
- Matte Finish: This finish absorbs light, which works directly against your goal of brightening the room. It is also porous and nearly impossible to clean, trapping grease and stains permanently.
- Eggshell Finish: While it has a slight luster, eggshell lacks the industrial-strength durability required for high-touch cabinet doors and drawers. It scuffs easily and will not withstand repeated cleaning.
Ultimately, the right sheen is a critical component for successfully brightening a dark kitchen with painted cabinets, ensuring a finish that is not only beautiful but durable enough for the heart of your home.

The Professional Process: Achieving a Flawless, Factory-Like Finish
There is a significant difference between a weekend DIY paint job and a professional, industrial-strength cabinet finish. The goal of brightening a dark kitchen with painted cabinets is only successful when the final product is both beautiful and durable. This is achieved not just with quality paint, but with a meticulous, proven process. While house painters may use brushes and rollers, true cabinet refinishing experts use specialized equipment like HVLP (High Volume, Low Pressure) sprayers to deliver a perfectly smooth, factory-like surface that lasts.
Step 1: Meticulous Preparation
Proper prep work is not just a step; it is the absolute foundation of a quality cabinet painting job, accounting for 90% of the final result. Skipping any part of this critical phase guarantees failure, leading to chipping and peeling. Our process is built on a flawless foundation.
- Complete Disassembly: All doors, drawers, and hardware are carefully removed to ensure every surface can be treated properly.
- Thorough Degreasing: We use powerful degreasers to eliminate years of accumulated kitchen grease, oils, and contaminants that prevent proper adhesion.
- Sanding and De-glossing: Every inch of the cabinet surfaces is scuff-sanded. This removes the old, slick finish and creates a microscopic profile for the primer to grip onto permanently.
- Site Protection: Your kitchen is meticulously masked off. We protect your countertops, floors, backsplash, and appliances to contain our work area completely.
Step 2: The Critical Priming Stage
Primer is the essential bond between the old surface and the new top coat. We apply multiple thin coats of a high-adhesion, stain-blocking primer designed specifically for cabinetry. This vital step prevents tannins from dark wood from bleeding through your new light color, ensures true color accuracy, and creates an ultra-durable base that resists chipping for years to come.
Step 3: Applying the Top Coat for a Durable Finish
This is where the real transformation happens. We don’t use latex house paint. Our finish is an industrial-strength, pre-catalyzed lacquer-the same type of coating used in high-end cabinet manufacturing. We spray multiple fine coats to build up a hard, non-porous surface that is easy to clean and exceptionally durable. After a proper curing period, we reassemble your cabinets, revealing a stunning, flawless finish. This professional system is the key to successfully brightening a dark kitchen with painted cabinets for the long term. See our professional process in action and get a fast, accurate quote.
Amplify the Brightness: 4 More Ways to Lighten Your Kitchen
You’ve transformed your space by painting your kitchen cabinets, but the work doesn’t have to stop there. To truly maximize the light and create a brilliant, open-feeling room, you can make several other key updates. These complementary changes work in tandem with your new cabinet finish to reflect light and eliminate shadows. The best part? These projects can be tackled over time, as your budget and schedule allow.
The goal of brightening a dark kitchen with painted cabinets is now complete, but these additional steps will take your results from great to flawless.
1. Upgrade Your Lighting
Proper lighting is a non-negotiable factor in any kitchen. Outdated fixtures or poorly placed lights can create shadows that make even the brightest white cabinets feel dull. Make these strategic lighting upgrades for a huge impact:
- Add Under-Cabinet Lighting: Install simple LED strips under your upper cabinets. This directly illuminates your countertops, eliminating dark work areas and adding a layer of sophisticated, functional light.
- Swap Fixtures and Bulbs: Replace old, heavy fixtures with modern, open designs. Use LED bulbs with a ‘daylight’ color temperature (5000K-6500K) to mimic natural light and make colors appear crisp and true.
- Install Recessed or Pendant Lights: For a total lighting overhaul, adding recessed can lights provides excellent overall illumination. A statement pendant light over an island or sink can also serve as a beautiful and bright focal point.
2. Install a Lighter Backsplash & Countertop
Your surfaces have a massive effect on how light moves around the room. Dark countertops and backsplashes absorb light, cancelling out the benefits of your newly painted cabinets. When you’re ready to upgrade, choose materials that reflect light back into the space. A glossy, light-colored backsplash-like classic white subway tile-is an affordable and highly effective choice for bouncing light. For countertops, consider durable quartz or light-colored granite to complete the transformation.
3. Choose Reflective Hardware and Accents
Think of your cabinet hardware as jewelry for your kitchen. Switching from dark or dated knobs and pulls to a more reflective material is a quick, high-impact update. Polished chrome, brushed nickel, or satin brass hardware will catch the light and add a touch of sparkle. You can also amplify this effect by strategically swapping a few solid cabinet doors for glass-front panels, which breaks up the color and adds visual depth.
4. Repaint Your Walls and Ceiling
Never underestimate the power of paint. The wall color surrounding your cabinets plays a vital role. A dark or saturated wall color will shrink the space and absorb light. A fresh coat of paint in a light, neutral shade like off-white, light gray, or a soft beige will support the goal of brightening a dark kitchen with painted cabinets. For maximum effect, paint the ceiling a crisp, flat white to make it feel higher and reflect the most light possible downward into your kitchen.
While these updates complete the look, the foundation of a bright kitchen is a flawless, professional cabinet finish. See our proven refinishing process to understand what makes our work last.
Transform Your Kitchen from Dark to Dazzling
You don’t have to live with a kitchen that feels small and dim. As this guide has shown, choosing the right light-reflecting paint color and sheen are the keys to a dramatic transformation. The most effective strategy for brightening a dark kitchen with painted cabinets combines smart color choices with a professional application that guarantees a durable, light-bouncing surface. This isn’t just a paint job; it’s a complete revitalization of your home’s most important space.
Achieving a true, factory-like finish is not a DIY project. It requires expertise and the right materials. At Cabinet refinishing Denver, we bring over 38 years of experience to every job in the Denver area. We use industrial-strength lacquers, not house paint, to ensure a flawless and long-lasting result, a commitment to quality backed by our A+ rating from the Better Business Bureau. If you’re ready to see the difference professional refinishing makes, we’ve made getting started simple.
Your bright, beautiful kitchen is just a text away.
Frequently Asked Questions About Brightening Your Kitchen
What is the best white paint color for kitchen cabinets to brighten a room?
For a clean, bright look, we recommend colors like Sherwin-Williams Extra White or Benjamin Moore Chantilly Lace. These are neutral whites that reflect maximum light. If you prefer a softer feel, a slightly off-white like SW Alabaster works well. The key is choosing a color with a high Light Reflectance Value (LRV) to make your space feel larger and more open. Our experts can help you select the perfect shade for your home.
How much does it cost to have dark kitchen cabinets professionally painted white?
The cost depends on your kitchen’s size, the number of doors, and the prep work required. For an average-sized kitchen, a professional finish typically ranges from $3,000 to $7,000. This investment guarantees a durable, factory finish that lasts. For an accurate price immediately, we recommend counting your doors and drawers and texting us a picture. This is the fastest way to get a transparent quote for your project.
Can you paint dark wood or laminate cabinets a lighter color?
Absolutely. The key to a lasting finish on dark or slick surfaces is meticulous prep work. For dark wood, we use industrial-strength, precatalyzed primers to block tannin bleed-through. For laminate, a specialized bonding primer is essential for proper adhesion. Skipping this vital step is why amateur paint jobs fail. Our process ensures your new, light color will be flawless and durable, regardless of the original surface material.
How long does a professional painted cabinet finish last?
A professionally applied, industrial-strength cabinet finish should last 8 to 15 years with proper care. Unlike standard house paint, we use high-quality, durable lacquers designed specifically for cabinetry. This creates a hard, non-porous surface that resists chipping, yellowing, and daily wear and tear. The longevity of our factory finish is a direct result of our extensive prep work and the superior materials we use for every project in the Denver area.
Is it better to spray or brush paint kitchen cabinets for a bright finish?
For a truly professional look, spraying is far superior to brushing. Spraying applies the coating in thin, even layers, resulting in a flawless, glass-smooth factory finish with no brush strokes. This smooth surface reflects light more evenly, which is a critical factor in brightening a dark kitchen with painted cabinets. Brushing often leaves texture and imperfections that can trap shadows and dull the final appearance, detracting from the brightness you want to achieve.
Will painting my oak cabinets white hide the wood grain?
Painting oak cabinets will cover the wood’s color, but it will not completely eliminate the deep grain texture. Our professional process includes using high-build, precatalyzed primers that help fill and smooth the grain significantly more than any DIY job. While some of the characteristic oak texture may remain slightly visible up close, the overall appearance will be a uniform color that dramatically brightens your space and gives you a clean, updated look.

