
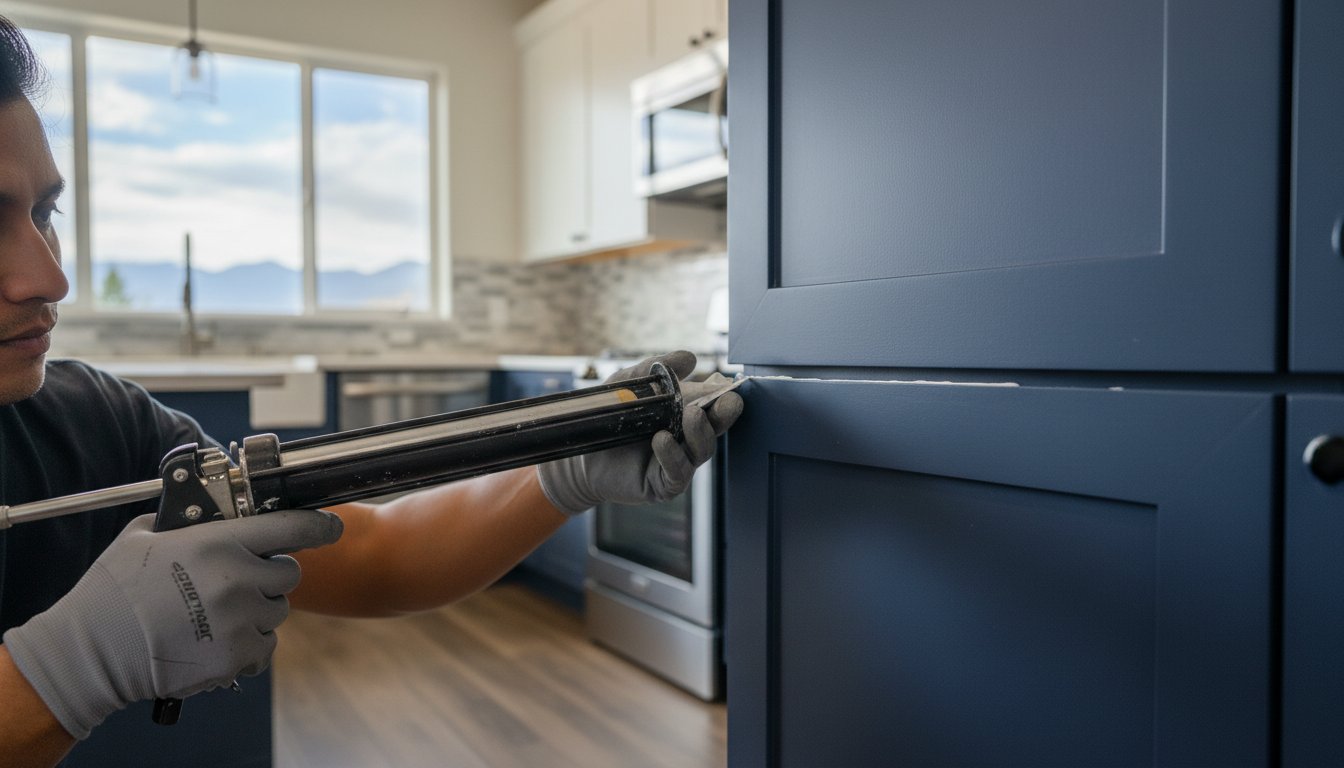
That hairline crack that appears between a cabinet door frame and its center panel is more than just an eyesore-it’s the tell-tale sign of an amateur paint job destined to fail. If you’re worried about your newly painted cabinets looking cheap or developing ugly gaps over time, the problem often comes down to one critical step that is frequently skipped. The secret to a durable, seamless finish is the expert application of caulking cabinets. It’s a fundamental part of our prep work that creates the monolithic, factory-like appearance that defines a professional project.
Cabinet Painting Service Areas in Denver & Surrounding Cities, Cabinet Refinishing in Denver County, CO
Serving Lakewood, CO, Littleton, CO, Golden, CO,
Arvada, CO, Wheat Ridge, CO, Evergreen, CO,
and Morrison, CO. Parker CO. Castle Pines CO. Englewood CO. Centennial CO.
Cabinet Painting in Arapahoe County, CO
Including Centennial, CO, Greenwood Village, CO,
Cherry Hills Village, CO, Englewood, CO,
and Aurora, CO.
Cabinet Painting in Adams County & Broomfield, CO
In this guide, we will show you exactly why this process is non-negotiable for a crack-free result. We’ll explain the difference between the cheap fillers many painters use and the industrial-strength sealants required for wood’s natural movement. You will learn what to look for in a painter’s process, giving you the knowledge to ensure your kitchen cabinet painting project results in a flawless, long-lasting finish you can trust.
Key Takeaways
-
Understand why professional caulking is the non-negotiable step that creates the seamless, monolithic appearance of a true factory finish.
-
Learn the critical difference between stationary joints that require sealing and moving parts that must be left un-caulked to prevent paint failure.
-
Discover why using professional-grade, flexible caulk is essential for a durable finish that resists cracking, unlike cheap latex products used by amateurs.
-
Properly caulking cabinets is not a standalone task but an integral part of a meticulous, multi-stage preparation process built for longevity.
Table of Contents
-
Where to Caulk Cabinets for a Perfect Finish (And Where NOT To)
-
Not All Caulk is Created Equal: Professional-Grade vs. DIY Products
-
The Caulking Process: How We Integrate It Into Our Prep Work
Why Caulking Is a Non-Negotiable Step for a Factory Finish
In over 45 years of professional cabinet refinishing, we’ve learned that the final quality of a paint job is determined long before the first coat of paint is sprayed. The most vital factor is the preparation work, and a critical part of that process is caulking. Skipping this step is the mark of an amateur, resulting in a finish that looks cheap and fails prematurely. Proper caulking cabinets is what separates a standard paint job from a truly professional, durable factory finish.
The visual difference is stark. An un-caulked cabinet will show distracting, dark shadow lines at every joint and seam. It looks like what it is: a collection of separate wood pieces painted over. A professionally caulked cabinet, however, appears as a single, solid piece-smooth, seamless, and flawless.
Creating a Seamless, Monolithic Look
Your cabinets are not one solid block of wood. They are constructed from frames, panels, and trim meticulously joined together. These seams, no matter how tight, create tiny gaps and shadow lines that disrupt the surface. Professional caulking fills every one of these voids before priming. The result is a smooth, continuous surface that makes the final paint job look monolithic-like a single, solid unit. This meticulous detail work is a cornerstone of achieving a true, high-end factory finish.
The Role of Caulk in Long-Term Durability
Wood is a natural material that expands and contracts with changes in temperature and humidity. A cheap, rigid caulk will quickly dry out, crack, and pull away, taking the paint with it. We use a premium, flexible sealant specifically designed for this purpose. If you’re wondering about the material science, you can get a technical overview of What is Caulk? from this resource. This flexibility allows the caulk to move with the wood, preventing cracks at the seams and ensuring the paint finish remains intact. This process of caulking cabinets also seals the joints, blocking out kitchen grease, moisture, and cleaning agents that could otherwise seep in and cause long-term damage to the wood.
Where to Caulk Cabinets for a Perfect Finish (And Where NOT To)
The difference between a professional, factory-finish paint job and one done by an amateur often comes down to the details. Knowing where to apply caulk-and more importantly, where not to-is one of those critical details. The fundamental rule is simple: caulk is for sealing stationary joints and gaps, not for parts that are designed to move. Proper caulking cabinets is about creating a seamless, monolithic look that will last, not creating a future point of failure.
Essential Areas for Caulking
For a truly professional and durable finish, we apply high-quality, paintable caulk to specific static joints. This eliminates unsightly shadow lines and creates the appearance of a single, solid unit. Applying a clean, smooth bead is a skill, and learning how to caulk like a pro is essential for achieving a seamless result. Our process includes caulking the following areas:
-
Where Face Frames Meet the Cabinet Box: This seals the gap between the front frame and the main body of the cabinet, preventing dark cracks from showing through the paint.
-
Joints Within the Face Frames: Any vertical or horizontal seams in the cabinet frames themselves are caulked to make them look like a single, solid piece of wood.
-
Trim and Molding Gaps: We meticulously caulk the gaps where crown molding, light rail, or other trim pieces meet the cabinet boxes.
-
Cabinets to the Wall: For that truly built-in look, sealing the seam where the cabinet side panels meet the wall is a non-negotiable step.
Critical ‘Do Not Caulk’ Zones
This is where inexperienced painters make their biggest, most damaging mistakes. Caulking moving parts is a guarantee that your paint job will fail. Wood naturally expands and contracts with changes in temperature and humidity. If you restrict this movement, the finish will crack and peel. It is a tell-tale sign of an amateur job.
-
NEVER Caulk Cabinet Doors or Drawer Fronts: Do not caulk the perimeter or any joints on a cabinet door. Doors must remain as separate, moving components.
-
NEVER Caulk Floating Panels: On Shaker-style doors and other five-piece doors, the center panel is designed to "float" within the frame. This allows it to expand and contract without damaging the door. Caulking this joint traps the panel, which will cause the paint to crack along the seam as the wood moves.

Not All Caulk is Created Equal: Professional-Grade vs. DIY Products
The secret to a durable, factory-finish look isn’t just in the application-it’s in the materials. One of the biggest mistakes amateur painters make is grabbing a cheap, all-purpose tube of caulk from the hardware store. This single shortcut guarantees failure. The type of caulk used is a major differentiator between a paint job that looks good for a few months and one that lasts for years. A professional understands that cabinets demand specific properties: permanent flexibility, zero shrinkage, and absolute paintability.
Why Cheap Latex or Silicone Caulk Fails on Cabinets
Standard painter’s caulk or all-purpose latex products are simply not designed for the stresses of cabinet construction. They are too rigid and brittle. Here’s exactly why they fail:
-
Shrinkage: As cheap caulk cures, it shrinks significantly. This pulls it away from the wood, reopening the very gaps you intended to fill and creating a thin, weak seal.
-
Cracking: Cabinets are made of wood, which naturally expands and contracts with changes in temperature and humidity. Inflexible caulk cannot move with the wood, so it cracks and splits, taking the paint with it.
-
Unpaintable Surfaces: Never use 100% silicone caulk on cabinets. Paint will not adhere to it, period. It will bead up and peel off, ruining the finish and making repairs a nightmare.
Using these inferior products results in cracked paint lines along all the seams, a tell-tale sign of an amateur job that will show up within the first year.
What Professionals Use: The Importance of Flexibility
To do the job the right way, we exclusively use industrial-strength, elastomeric or acrylic urethane caulks. These are not the same products you find in the DIY aisle. The most critical property of a professional-grade caulk is its superior flexibility. It creates a powerful, permanent bond that is designed to stretch and move with the wood, absorbing the stress of seasonal changes without breaking or pulling away from the joint. When it comes to caulking cabinets for a lasting finish, there is no substitute for materials engineered for high performance, superior adhesion, and zero shrinkage over time. This ensures the seamless, monolithic look we create lasts for the life of the paint job.
A Note on Application and Paintability
Beyond flexibility, professional-grade caulks are formulated for perfect paint adhesion. They cure to a smooth, non-porous surface that won’t absorb paint unevenly. This is critical for preventing an issue called ‘flashing,’ where the sheen of the caulk line looks different from the surrounding paint, making every seam visible. A high-quality caulk accepts primer and topcoats flawlessly, becoming a truly invisible part of the final finish. We only use industrial-grade materials for a lasting finish.
The Caulking Process: How We Integrate It Into Our Prep Work
At Painting Kitchen Cabinet Denver, we see caulking not as a standalone task, but as a critical, integrated step in our labor-intensive preparation process. Achieving a true, durable factory finish depends on a precise sequence of events. Skipping or reordering these steps is a common mistake made by amateur house painters and is the primary reason for cracked seams and failed paint jobs. Our process is built on over 45 years of experience and ensures that every layer, from the bare wood to the final topcoat, bonds perfectly for a flawless result.
Step 1: Preparation Before Caulking
Proper adhesion starts long before a tube of caulk is ever opened. First, all cabinet surfaces must be professionally degreased and cleaned to remove years of kitchen grime that would otherwise prevent adhesion. We then scuff-sand every surface to create a microscopic profile for the primer to grip. Only after this do we inspect every joint and seam, clearing them of any dust or debris to ensure the caulk can create a solid, unbreakable bond within the gap.
Step 2: Professional Application and Tooling
The application of caulk is a skill that directly impacts the final look of your cabinets. We apply a thin, consistent bead of high-quality, flexible sealant directly into the seams. This bead is then immediately "tooled" with professional methods to press the caulk firmly into the joint and smooth it perfectly flush with the wood surfaces. This meticulous work creates an invisible, seamless transition that will not show through the final paint finish, leaving only clean, sharp lines.
Step 3: Proper Curing and Priming
Patience is a non-negotiable part of our process. We allow the caulk to cure completely according to the manufacturer’s specifications, which can take up to 24 hours. Painting over uncured caulk is a guarantee for failure, as it will shrink and crack, ruining the finish. Once fully cured, we apply an industrial-strength, precatalyzed primer over the entire cabinet surface. This primer seals the caulk and wood, creating a uniform, non-porous substrate that is essential for achieving a consistent and durable topcoat.
This systematic approach to caulking cabinets is a vital part of the extensive prep work that defines our quality. It is this commitment to doing the job the right way that ensures your cabinet finish will look and feel brand new for years to come. To see the results of our detailed process, visit our gallery at paintingkitchencabinet.com.
The Final Word: Caulking is Non-Negotiable for a Flawless Finish
As we’ve detailed, achieving a seamless, crack-free cabinet finish isn’t about finding a shortcut-it’s about meticulous, professional preparation. The key difference between an amateur job and a true factory finish often comes down to the details. This includes using the right industrial-grade caulk in the correct places and, just as importantly, knowing where to avoid it. This critical step is what eliminates unsightly gaps and creates the solid, monolithic look of a brand-new kitchen.
The professional approach to caulking cabinets is just one part of the labor-intensive process we’ve perfected over 45 years of hands-on experience. At Painting Kitchen Cabinets Denver, we don’t compromise. We use exclusive industrial-strength acrylics and prep materials to deliver a guaranteed flawless, factory-like finish that is built to last. If you’re ready for a cabinet transformation done the right way, trust the experts. Get a quote from experts who understand that details matter.
Let’s build a finish that you’ll be proud of for years to come.
Frequently Asked Questions About Caulking Cabinets
Will the caulk on my painted cabinets crack over time?
Cracking is a direct result of using the wrong materials, like cheap latex painter’s caulk that becomes brittle. Wood naturally expands and contracts, and inferior caulk cannot handle that movement. At Painting Kitchen Cabinets Denver, we only use premium, flexible elastomeric sealants designed for cabinetry. This ensures the caulk moves with the wood, maintaining a seamless, crack-free finish for years. Proper material selection is not a shortcut; it’s essential for a durable job.
How long does caulk need to dry before you can paint cabinets?
The required dry time depends entirely on the quality of the caulk. While some cheap products claim to be paint-ready in an hour, this is not a professional standard. We allow our industrial-grade sealants to cure for a minimum of 4 to 24 hours, depending on job site conditions like humidity. Rushing this critical step is a hallmark of an amateur job and will compromise the bond between the primer and the caulk, leading to finish failure.
Can you caulk over old paint or does it need to be removed?
You should never caulk over old, unstable paint. The new caulk bead will only be as strong as the failing layer beneath it, meaning it will inevitably peel away. Proper prep work is the most vital factor for a lasting finish. All surfaces must be thoroughly cleaned, degreased, and sanded to create a sound foundation for any new materials. We apply caulk only after the cabinet surfaces have been professionally prepared to ensure a permanent bond.
What is the difference between caulk and wood filler for cabinets?
The main differences are flexibility and purpose. Wood filler is a hard, sandable material used to fill dents, deep grain, and holes on flat surfaces; it dries rigid and will crack in a moving joint. Caulk is a flexible sealant applied only to seams where two pieces of wood meet, such as door panel joints or where trim meets a cabinet box. Properly caulking cabinets is essential for sealing joints that expand and contract, a job wood filler cannot do.
Why did the caulk lines on my last paint job turn yellow or discolored?
Yellowing caulk is typically caused by using the wrong product, such as a 100% silicone caulk that is not truly paintable. Paint cannot properly adhere to silicone and will eventually discolor and peel off, revealing the yellowish caulk underneath. Professional cabinet painters use high-grade, paintable acrylic or elastomeric sealants that are specifically formulated to bond with professional primers and topcoats, ensuring the color stays true and the finish remains flawless.
Should you caulk the inside corners of cabinet boxes?
No, we do not recommend caulking the inside corners of cabinet boxes. These areas are subject to constant contact and friction from plates, cans, and other stored items. A caulk bead in this high-wear environment is likely to get dirty, peel, or be damaged, creating an unsightly maintenance issue. A clean, crisp paint line inside the cabinet box looks more professional and is significantly more durable for everyday use, which is why we avoid this unnecessary step.


